Integrations
Connecting SecureSlate & AWS Organization
Connecting an AWS Organization to SecureSlate lets you monitor all accounts in your organization from one integration — including accounts you add later when you use StackSet automatic deployment. SecureSlate uses read-only IAM roles and does not modify your AWS resources.
After connecting, findings appear on the Checks tab of the Cloud overview page, filtered by AWS.
If you only need one AWS account, use the single-account connect guide instead.
AWS Account vs AWS Organization
| Account | Organization | |
|---|---|---|
| Scope | One AWS account | All accounts in the org (with optional OU / exclude filters) |
| Setup | One policy + role in that account | Management account role + member roles (StackSet or manual) |
| Best for | Small teams, one account | Multi-account environments, AWS Control Tower |
Prerequisites
Before you start:
- SecureSlate permissions — access to create integrations (typically Admin).
- AWS management account — permission to create IAM policies and roles, and to create CloudFormation StackSets with organization deployment (recommended).
- CloudFormation StackSets trusted access — enabled in AWS Organizations (Organizations → Services → CloudFormation StackSets).
- Time — plan about 15–20 minutes for the Console wizard (management account + StackSet).
Wizard overview
The Organization + Console flow has five sidebar steps (plus Account & method at the start):
| Step | What you do |
|---|---|
| Select products | Choose AWS services to monitor (Control Tower is organization-only) |
| Management account | Create IAM policy + role in the management account and link the Role ARN |
| Member accounts | Define org scope, then deploy member roles (StackSet or manual IAM) |
| Select regions | Choose which regions to scan |
| Check connection | Save the integration and start the initial sync |
Management account (Part 1)
  └── SecureSlateManagementAccountPermissions + secureslate-auditor role
      └── Role ARN pasted in SecureSlate + Test Connection

Member accounts (Part 2)
  └── StackSet (recommended) or manual IAM per account
      └── SecureSlateAdditionalPermissions + secureslate-auditor in each member
Connect an AWS Organization (Console)
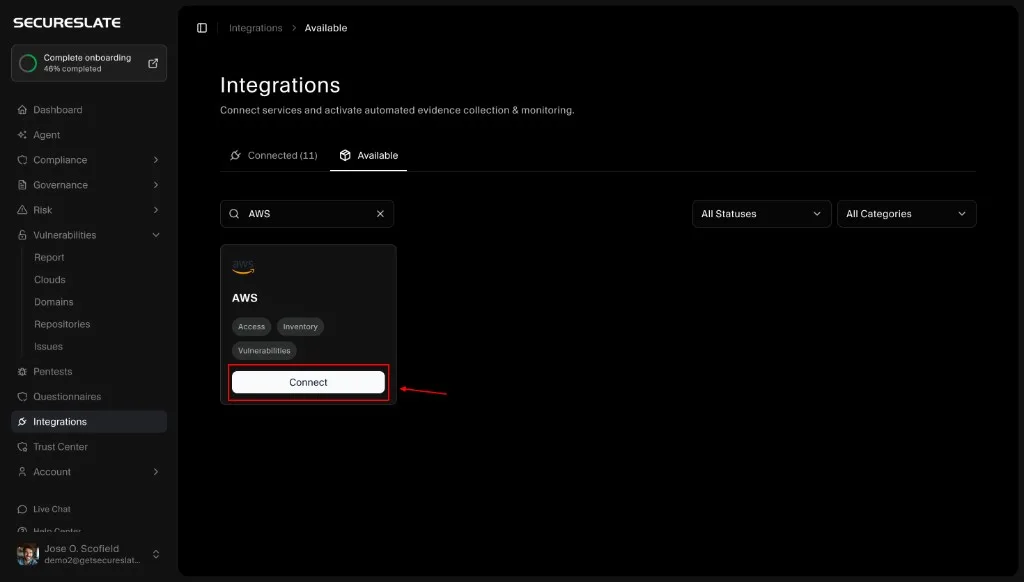
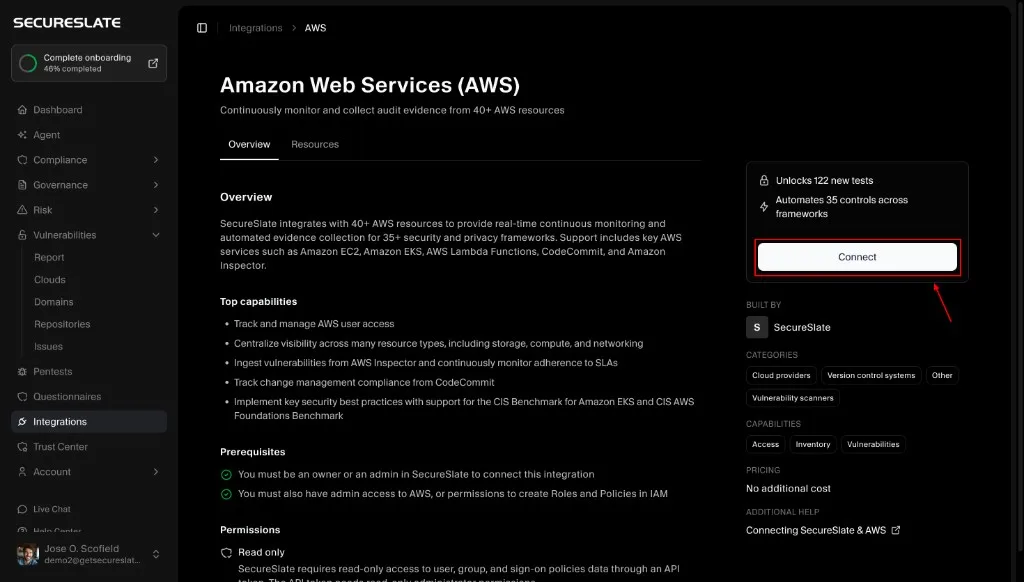
Step 1: Start the AWS integration setup
- In SecureSlate, go to Integrations.
- Open the Available tab.
- Search for AWS.
- Click Connect on the AWS card.
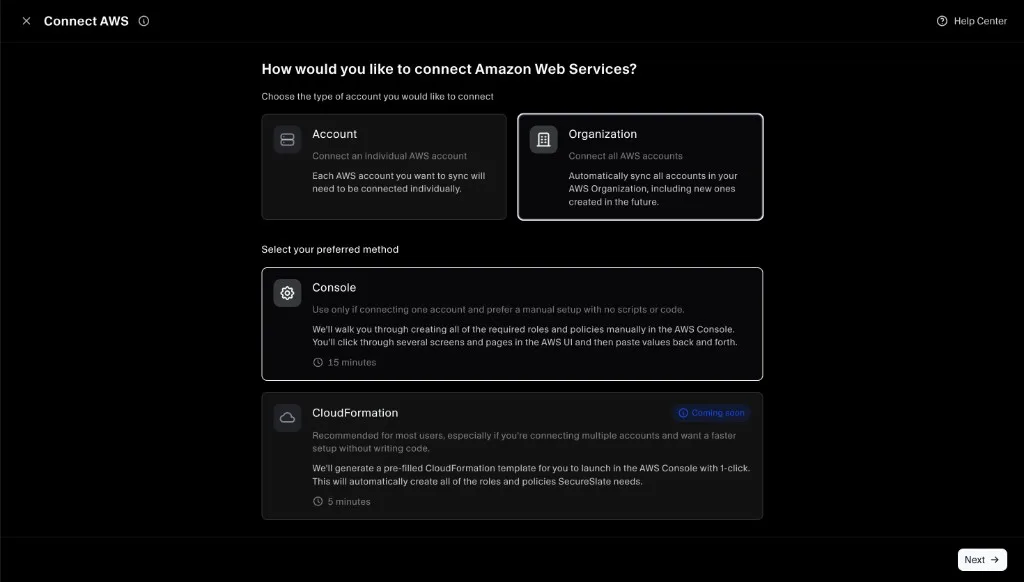
Step 2: Choose Organization + Console
- Select Organization.
- Under Select your preferred method, choose Console.
- Click Next.
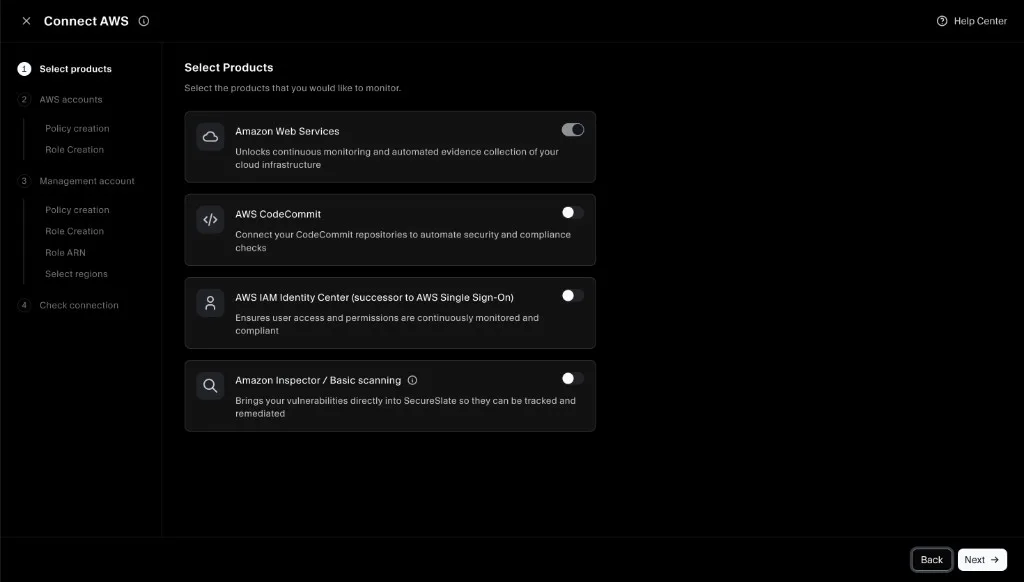
Step 3: Select products to monitor
Toggle on the products you want SecureSlate to monitor. Your selection determines what permissions appear in the IAM policies SecureSlate generates.
- Amazon Web Services — core cloud configuration monitoring (enabled by default)
- AWS CodeCommit — repository and change-review checks (optional)
- AWS IAM Identity Center — SSO / Identity Center monitoring (optional)
- Amazon Inspector / Basic scanning — vulnerability import (optional)
- AWS Control Tower — landing zone, guardrails, and enrollment checks from the management account only (connect guide)
Click Next when you are done.
Optional: AWS Control Tower
If you use AWS Control Tower, enable the AWS Control Tower product on this step. SecureSlate adds read-only Control Tower APIs to the management account policy only — member StackSet templates stay unchanged.
See Connecting AWS Control Tower with SecureSlate for what checks run after sync.

Step 4: Management account — create the IAM policy
SecureSlate shows a banner: Organization flow — Part 1 of 2: Management account only. Complete these steps only in your AWS Organization management (root) account.
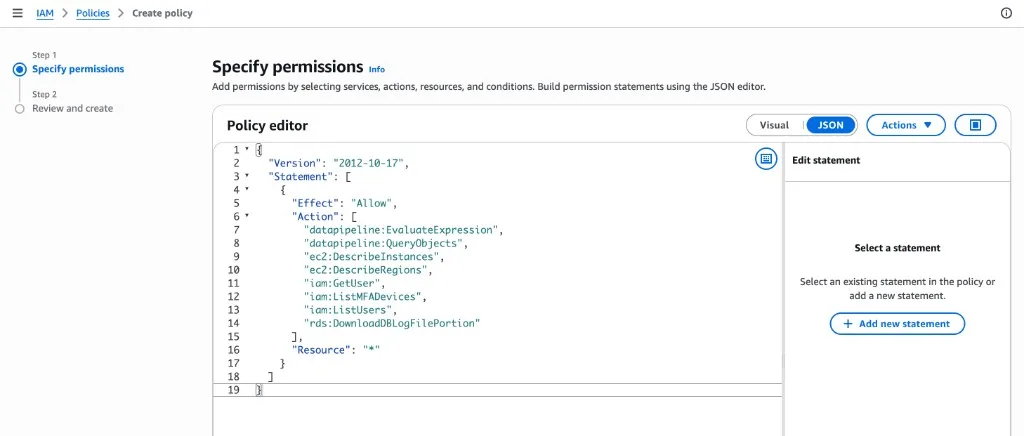
- In the SecureSlate wizard, copy the management account policy JSON.
- In the management account, go to IAM → Policies → Create policy.
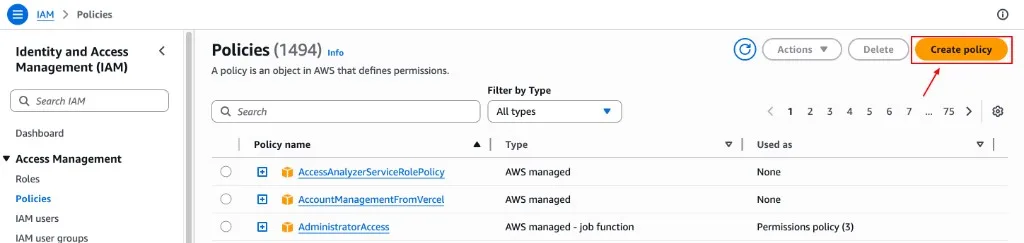
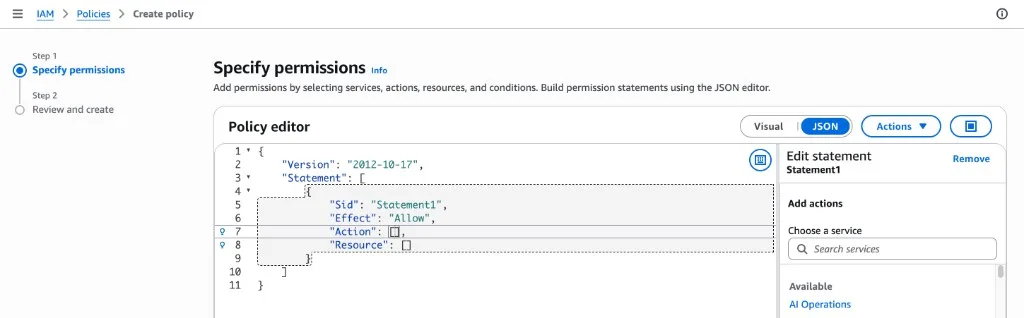
- Open the JSON tab, delete any prefilled text, and paste the policy from SecureSlate.
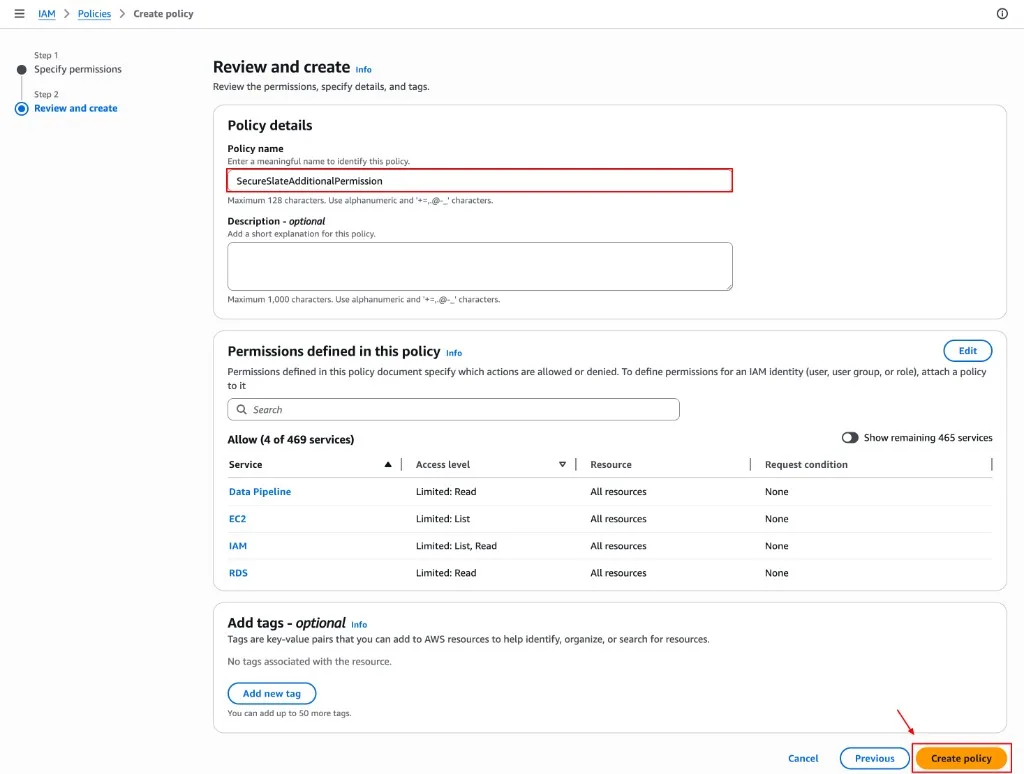
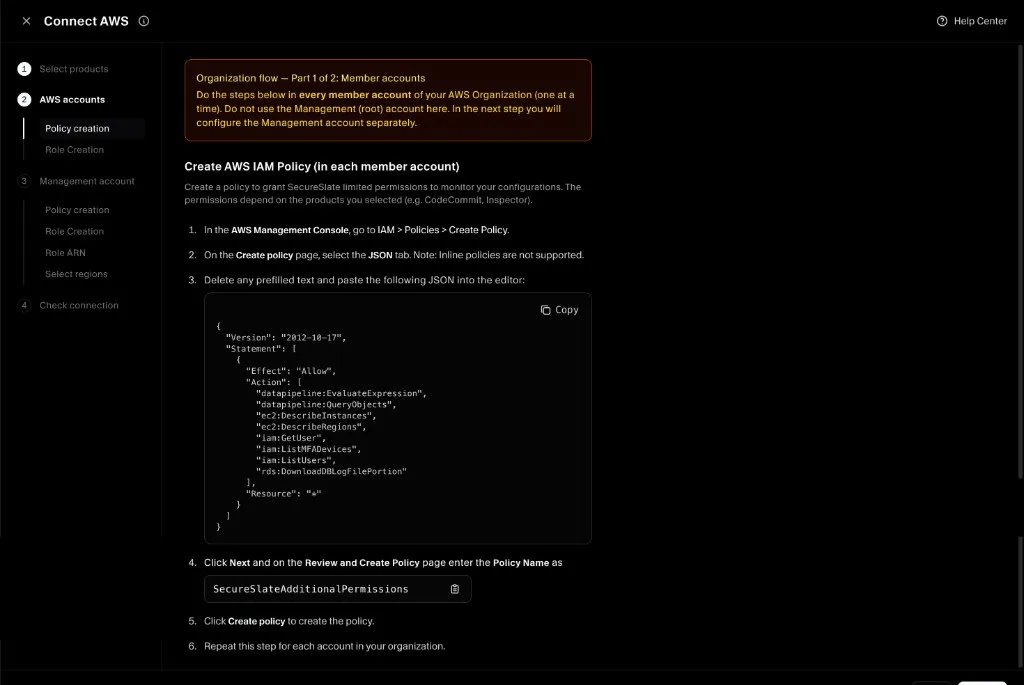
- Click Next, name the policy SecureSlateManagementAccountPermissions, and click Create policy.
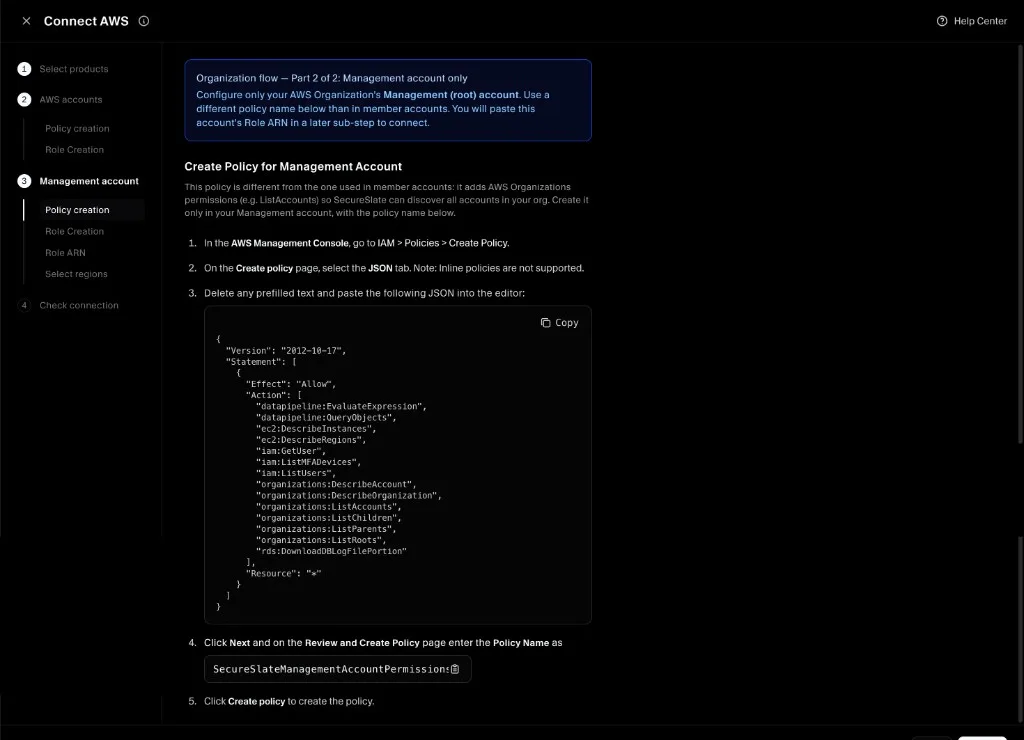
Note: Member accounts use a different policy name — SecureSlateAdditionalPermissions — in a later step. Do not create the member policy in the management account unless you also scan that account as a member.
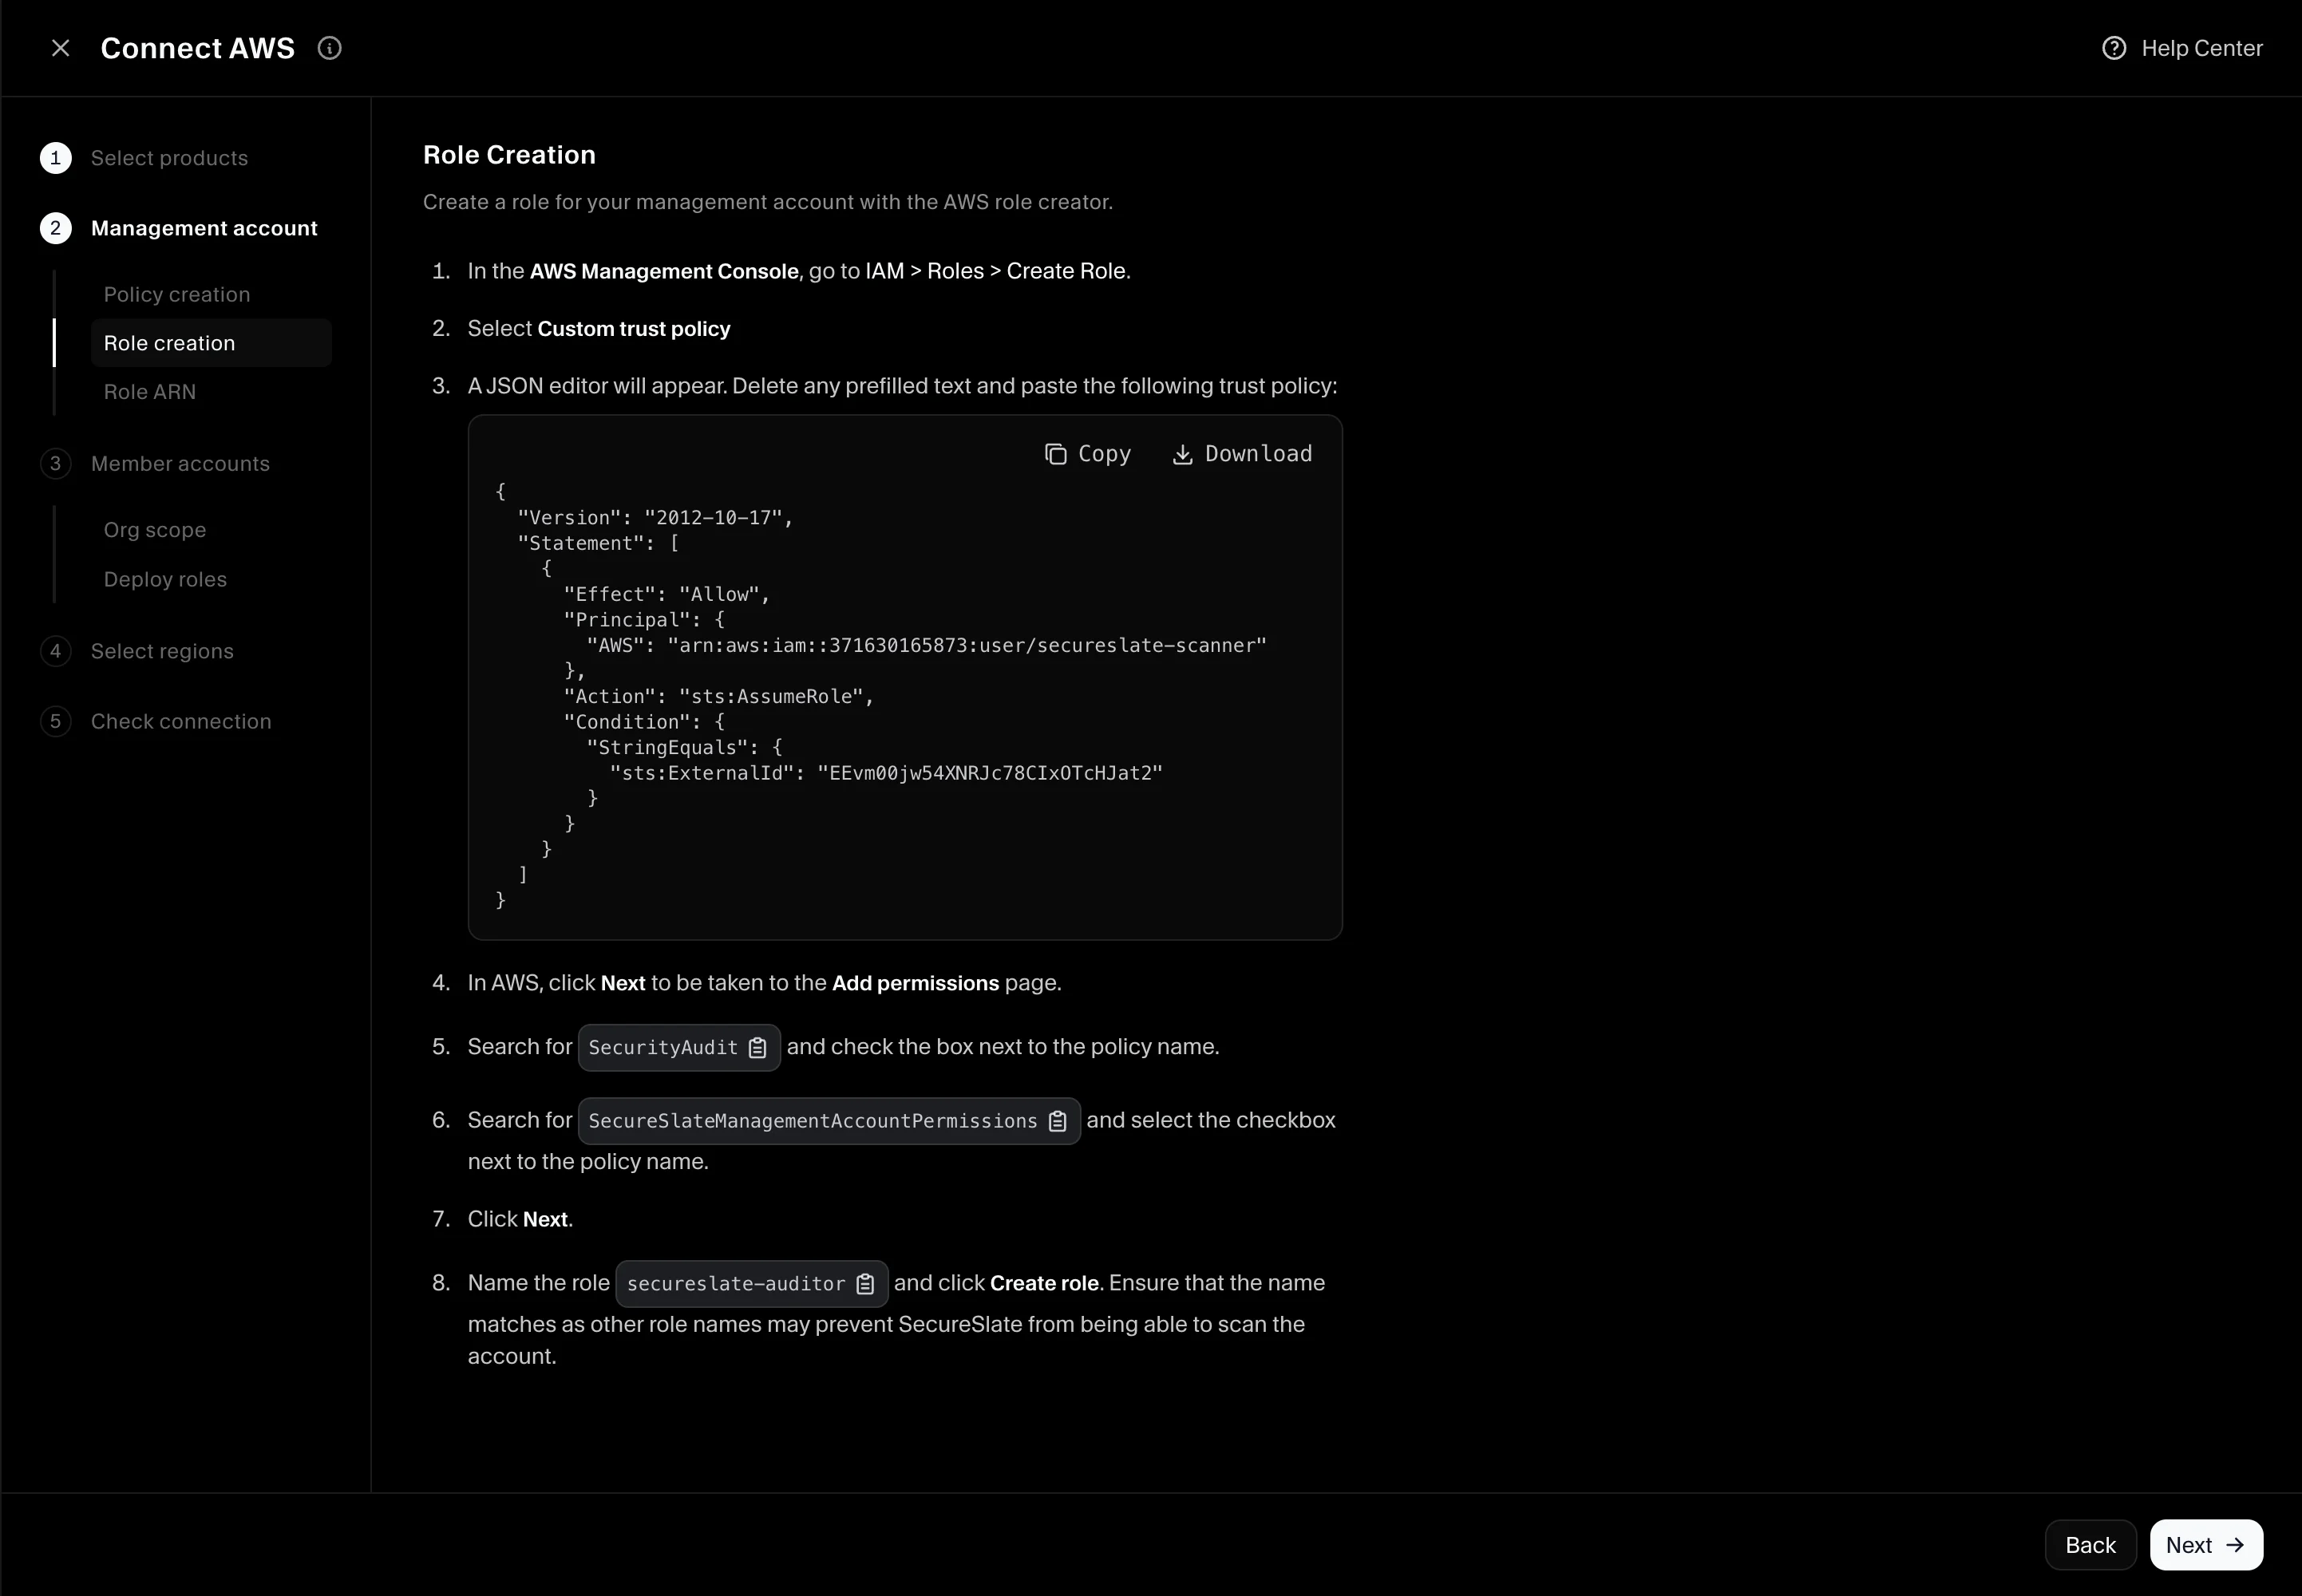
Step 5: Management account — create the IAM role
- In the management account, go to IAM → Roles → Create role.

- Select Custom trust policy.
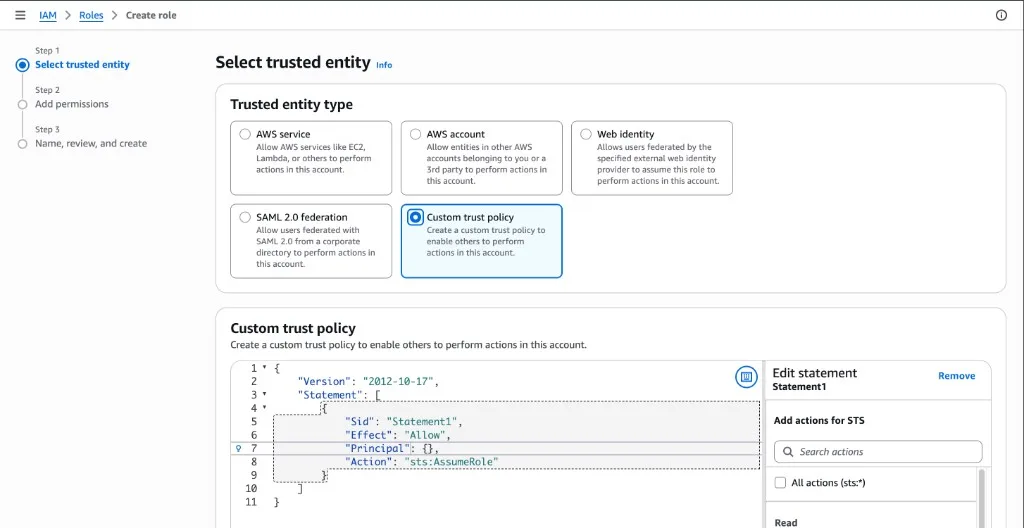
- Paste the trust policy from SecureSlate (includes your External ID).
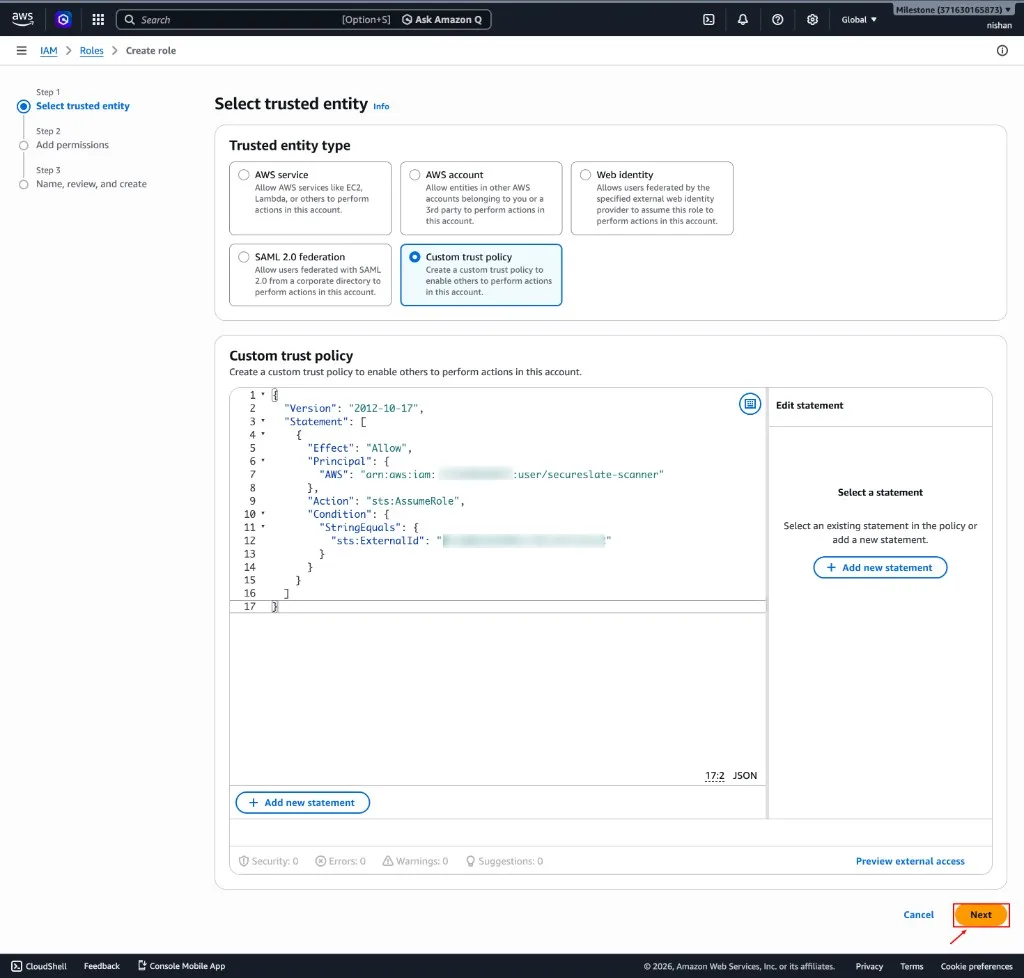
- Click Next and attach both policies:
- AWS managed SecurityAudit
- Customer-managed SecureSlateManagementAccountPermissions
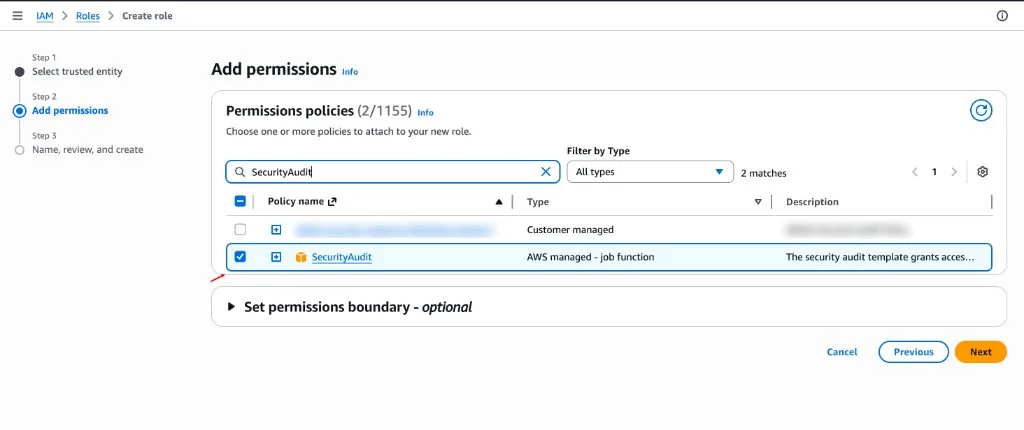
- Name the role secureslate-auditor and click Create role.
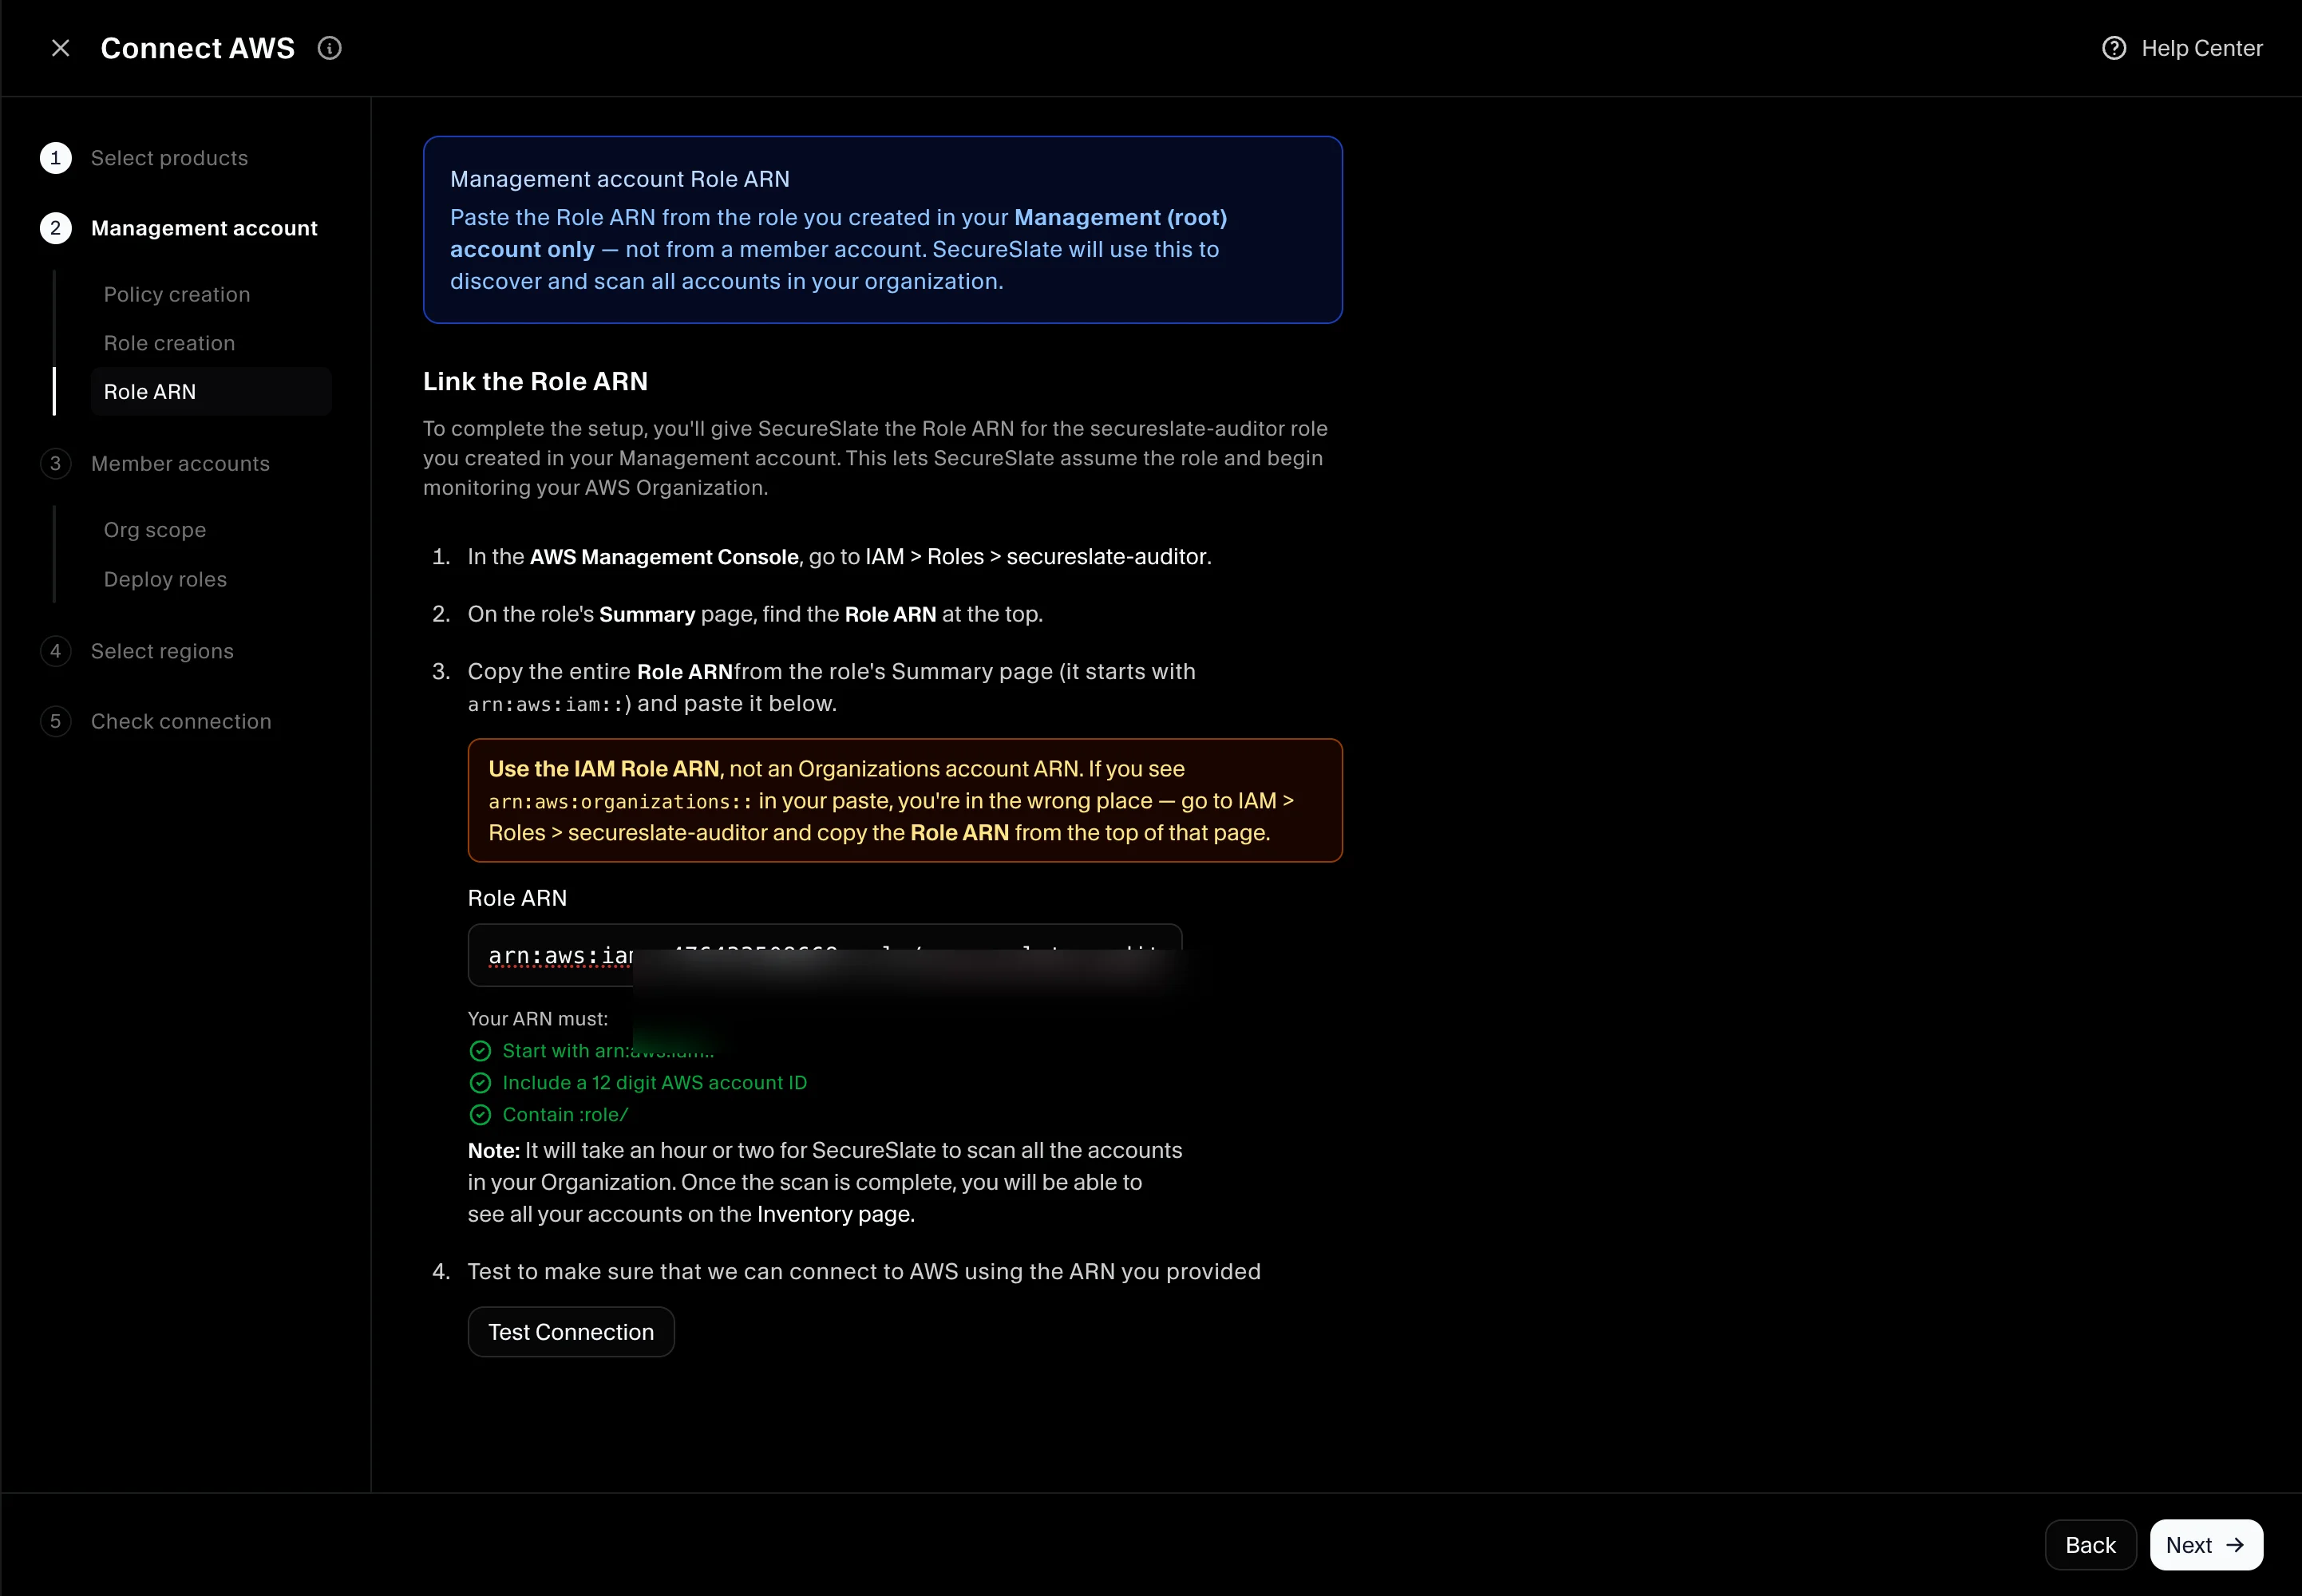
Step 6: Management account — link the Role ARN
- In the management account, open IAM → Roles → secureslate-auditor.
- Copy the Role ARN from the role summary (starts with
arn:aws:iam::). - Paste it into SecureSlate. Use the IAM Role ARN, not an Organizations account ARN.
- Click Test Connection to verify SecureSlate can assume the role.
- Click Next.
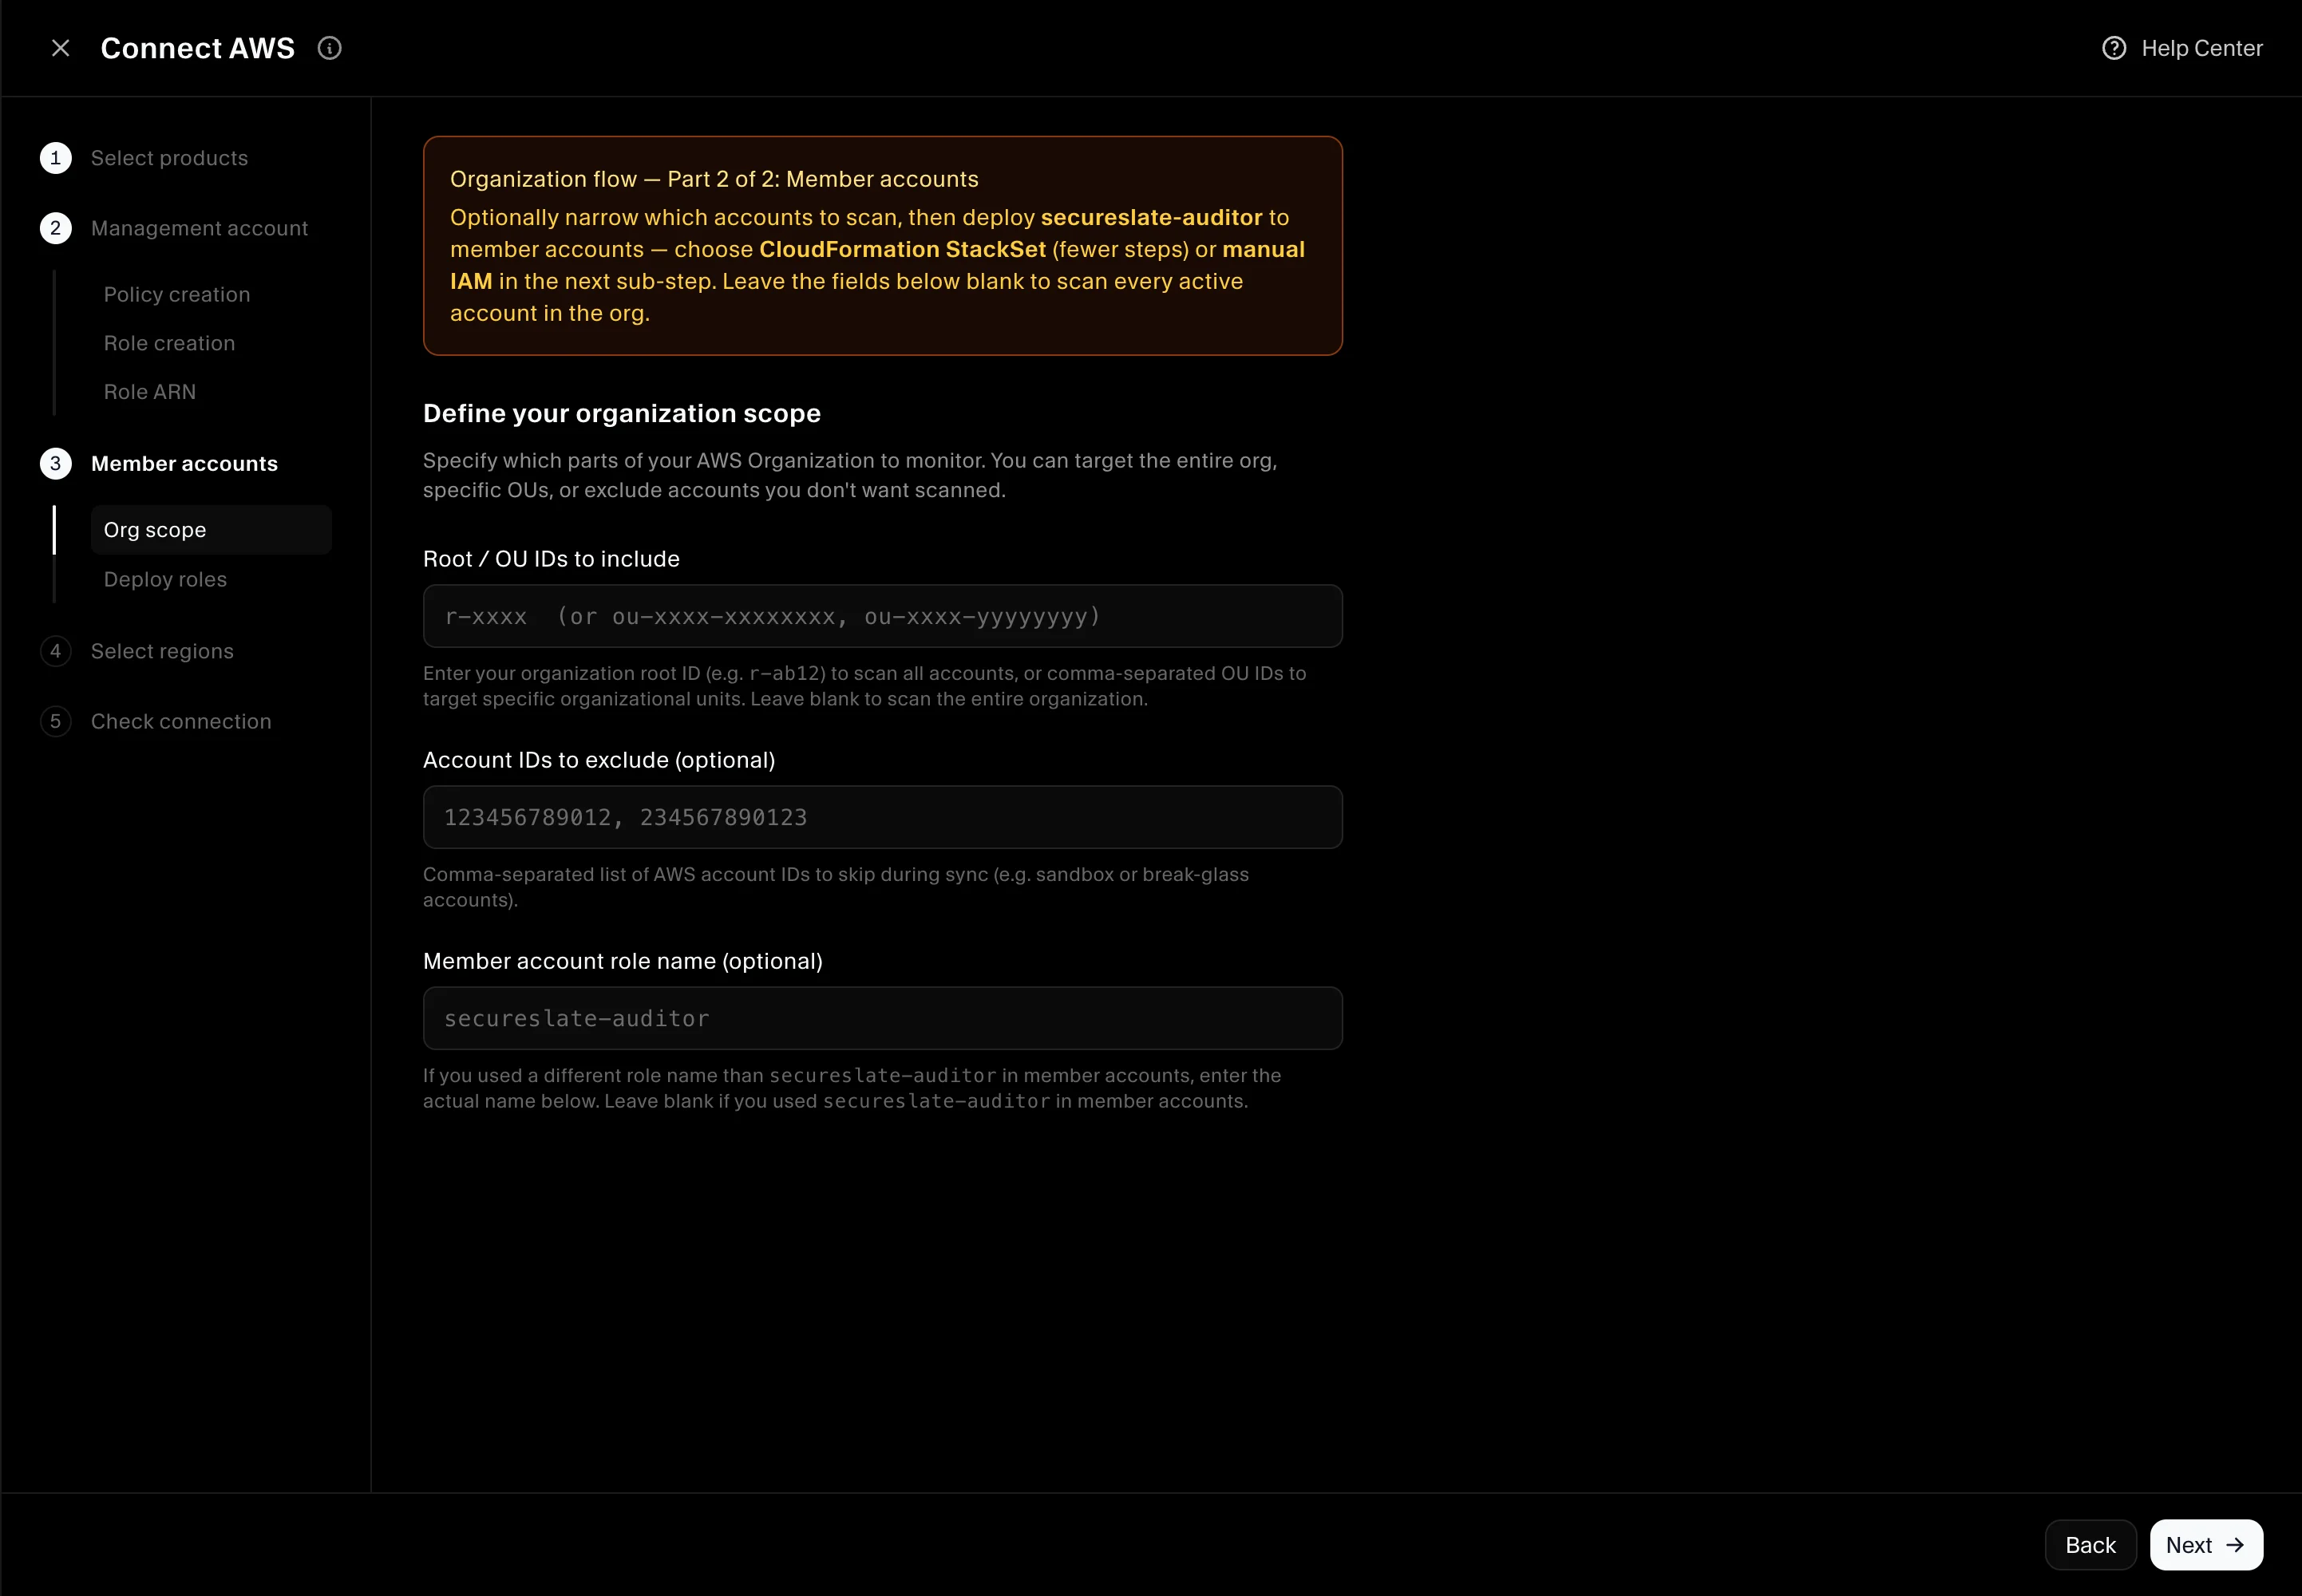
Step 7: Member accounts — define organization scope
SecureSlate shows: Organization flow — Part 2 of 2: Member accounts.
Optionally narrow which accounts to scan:
- Root / OU IDs to include — e.g.
r-ab12for the whole org, or comma-separated OU IDs. Leave blank to scan every active account. - Account IDs to exclude — optional comma-separated list (sandbox, break-glass, etc.).
- Member account role name — defaults to
secureslate-auditor. Change only if you used a different name in member accounts.
Click Next to deploy member roles.
Step 8: Member accounts — deploy roles (StackSet or manual)
Member accounts need the secureslate-auditor role with SecurityAudit and SecureSlateAdditionalPermissions. Choose one method:
Option A: CloudFormation StackSet (recommended)
From the management account:
- Enable trusted access for CloudFormation StackSets (Organizations → Services → CloudFormation StackSets).
- Copy the CloudFormation template from SecureSlate.
- Open CloudFormation → StackSets → Create StackSet (not Stacks → Create stack).
- Select Service-managed permissions and Upload a template file with the JSON from SecureSlate.
- Set StackSet name to
secureslate-member-accounts. - Under Deployment targets, choose Deploy to organization (or the OUs from Step 7).
- Under Automatic deployment, choose Activated so new accounts receive the role automatically.
- Select the regions you plan to monitor, then submit.
- Wait until stack instances reach SUCCEEDED (typically 2–5 minutes).
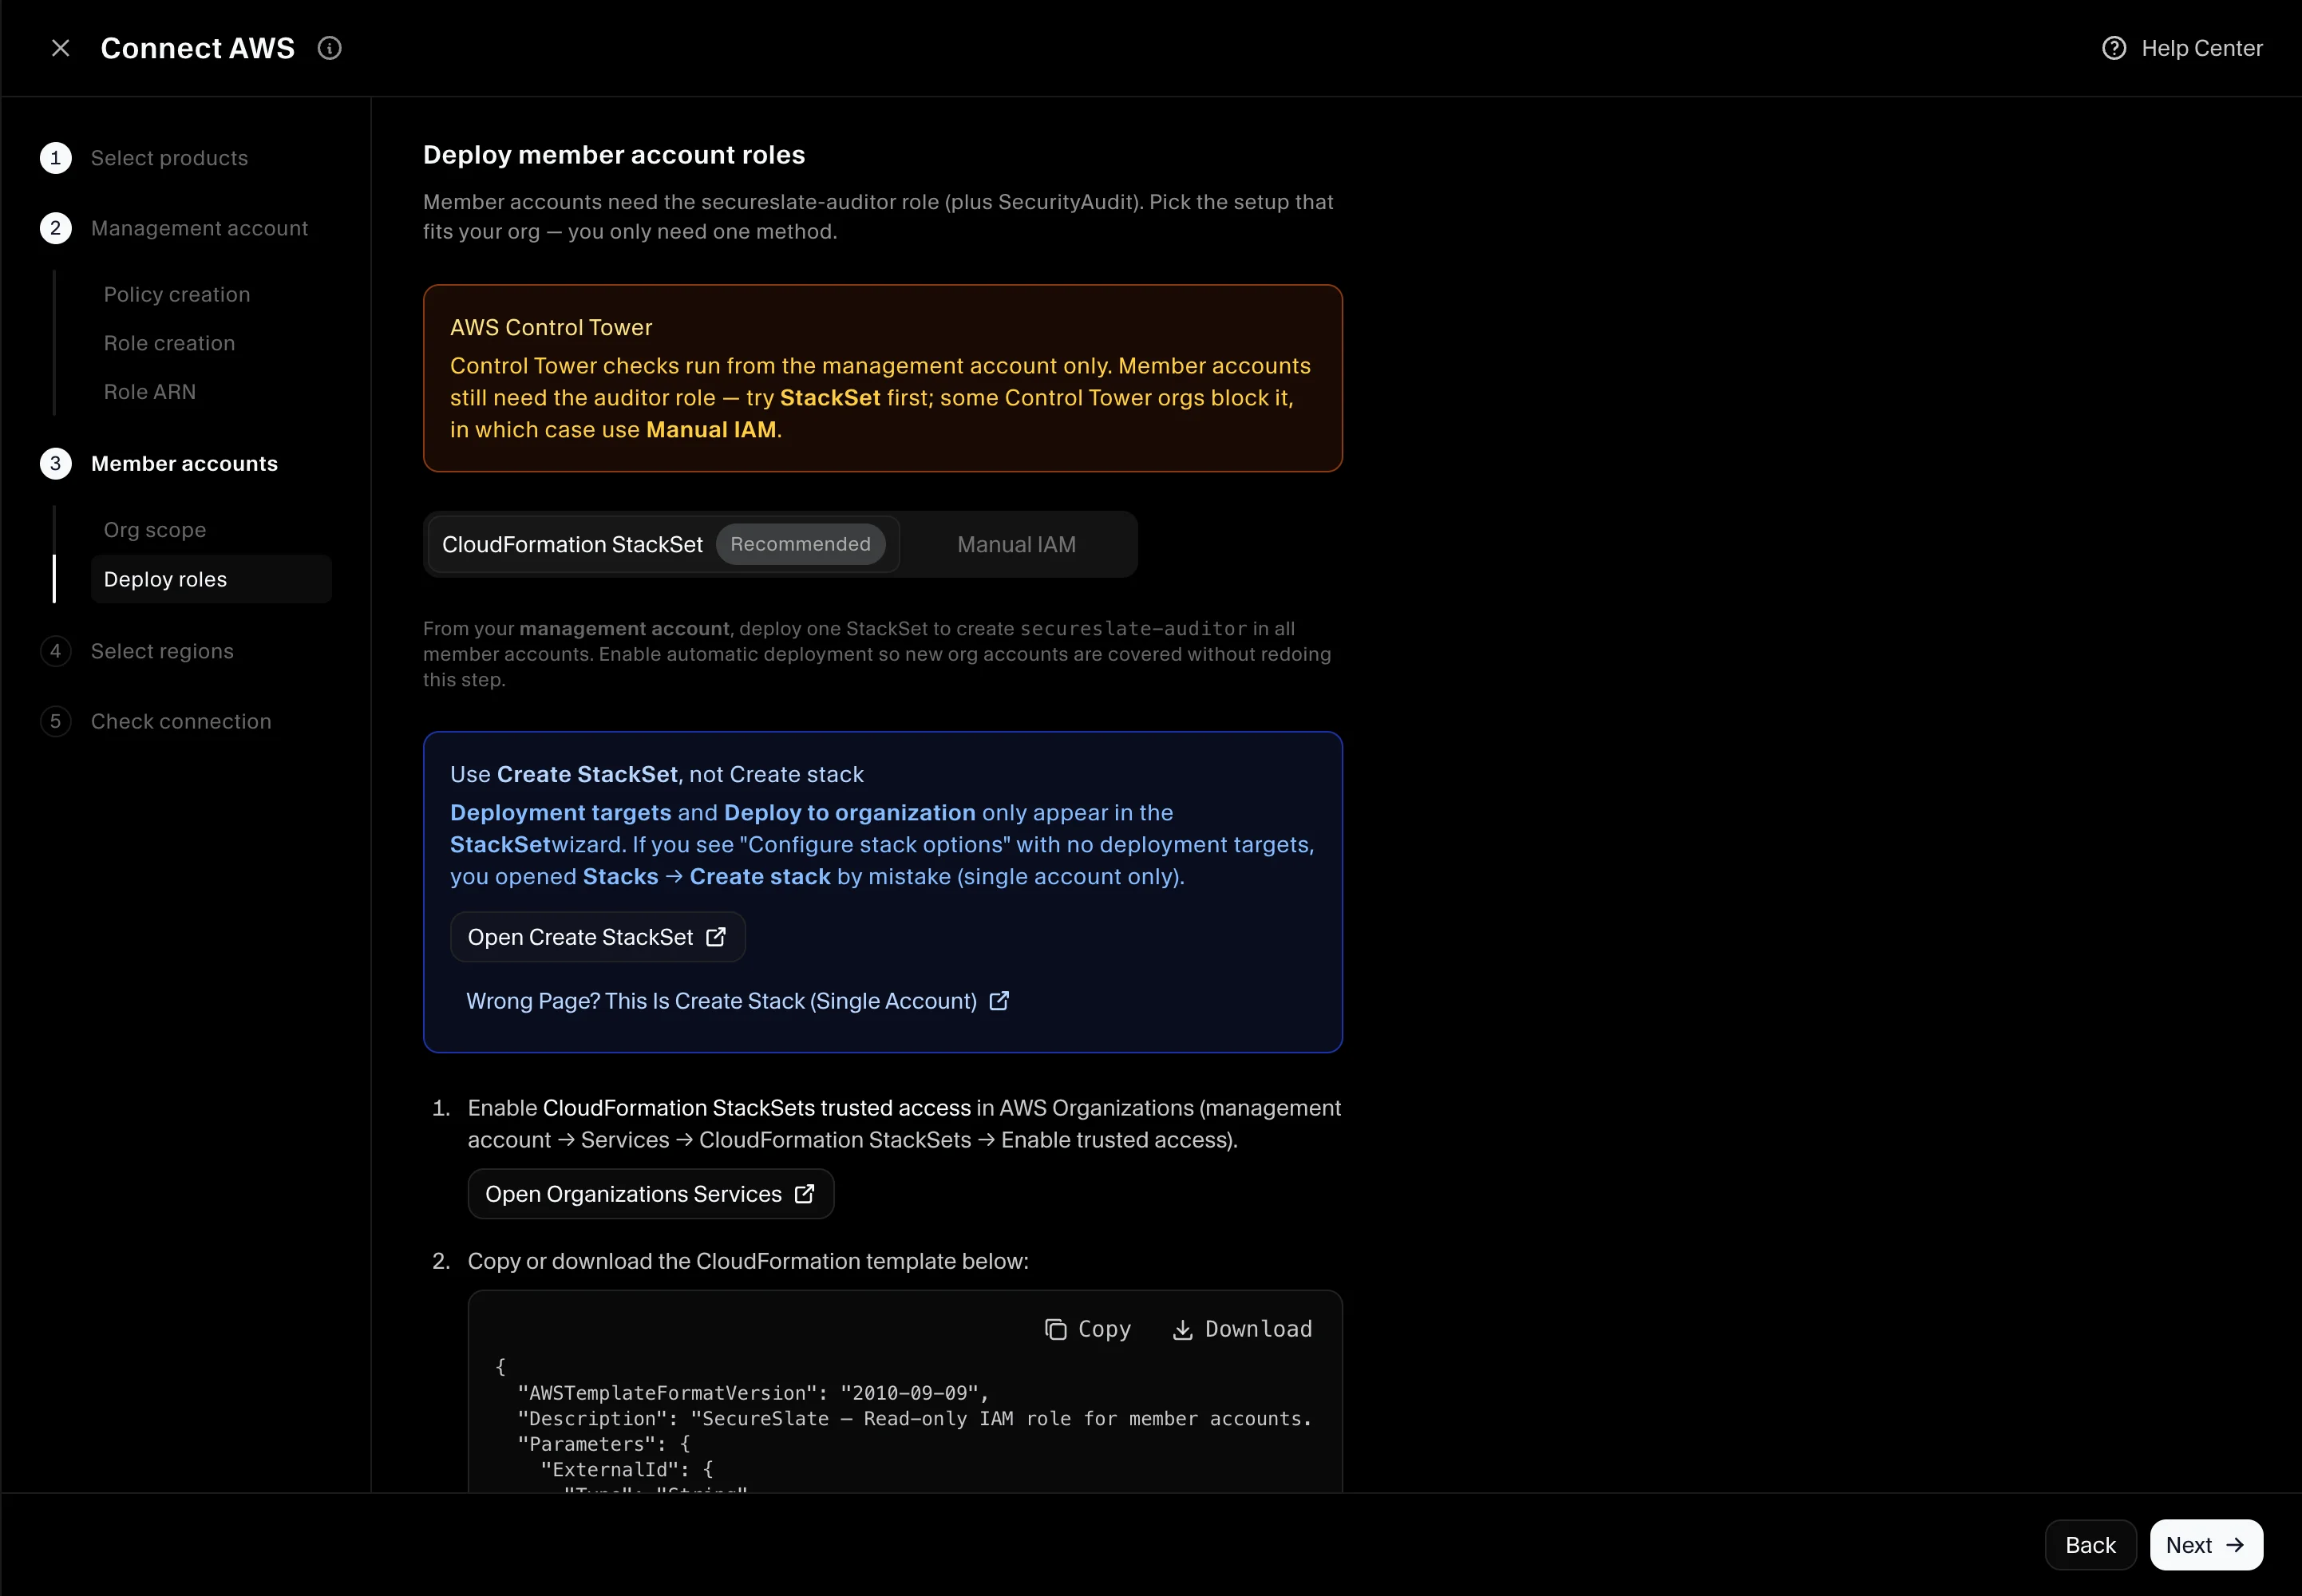
Control Tower permissions are not included in the member StackSet — they are management-account only.
Option B: Manual IAM (per member account)
If StackSet is blocked in your org (some Control Tower environments), sign in to each member account and repeat the single-account policy + role flow:
- Create customer-managed policy SecureSlateAdditionalPermissions from the member policy JSON in SecureSlate.
- Create role secureslate-auditor with the trust policy from SecureSlate; attach SecurityAudit and SecureSlateAdditionalPermissions.
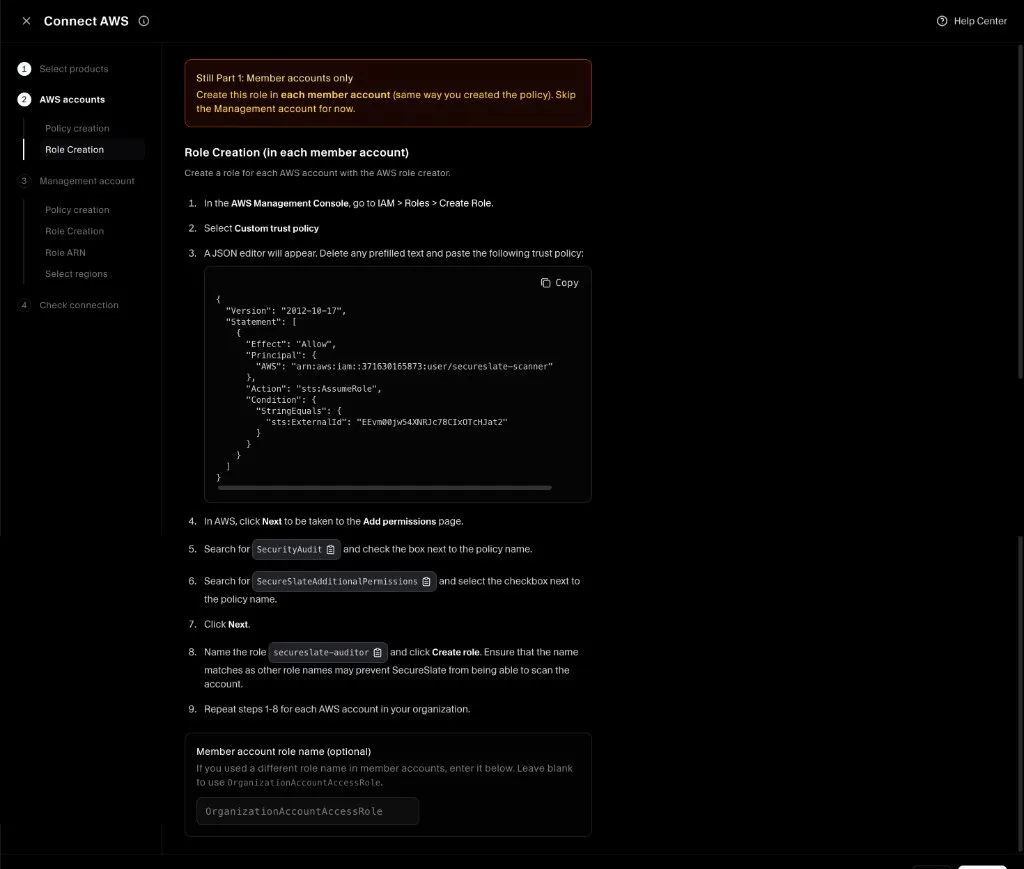
- Repeat for every member account in scope. Accounts that already have
secureslate-auditorneed no changes.
If you enabled AWS Control Tower, try StackSet first; use manual IAM if StackSet deployment fails.
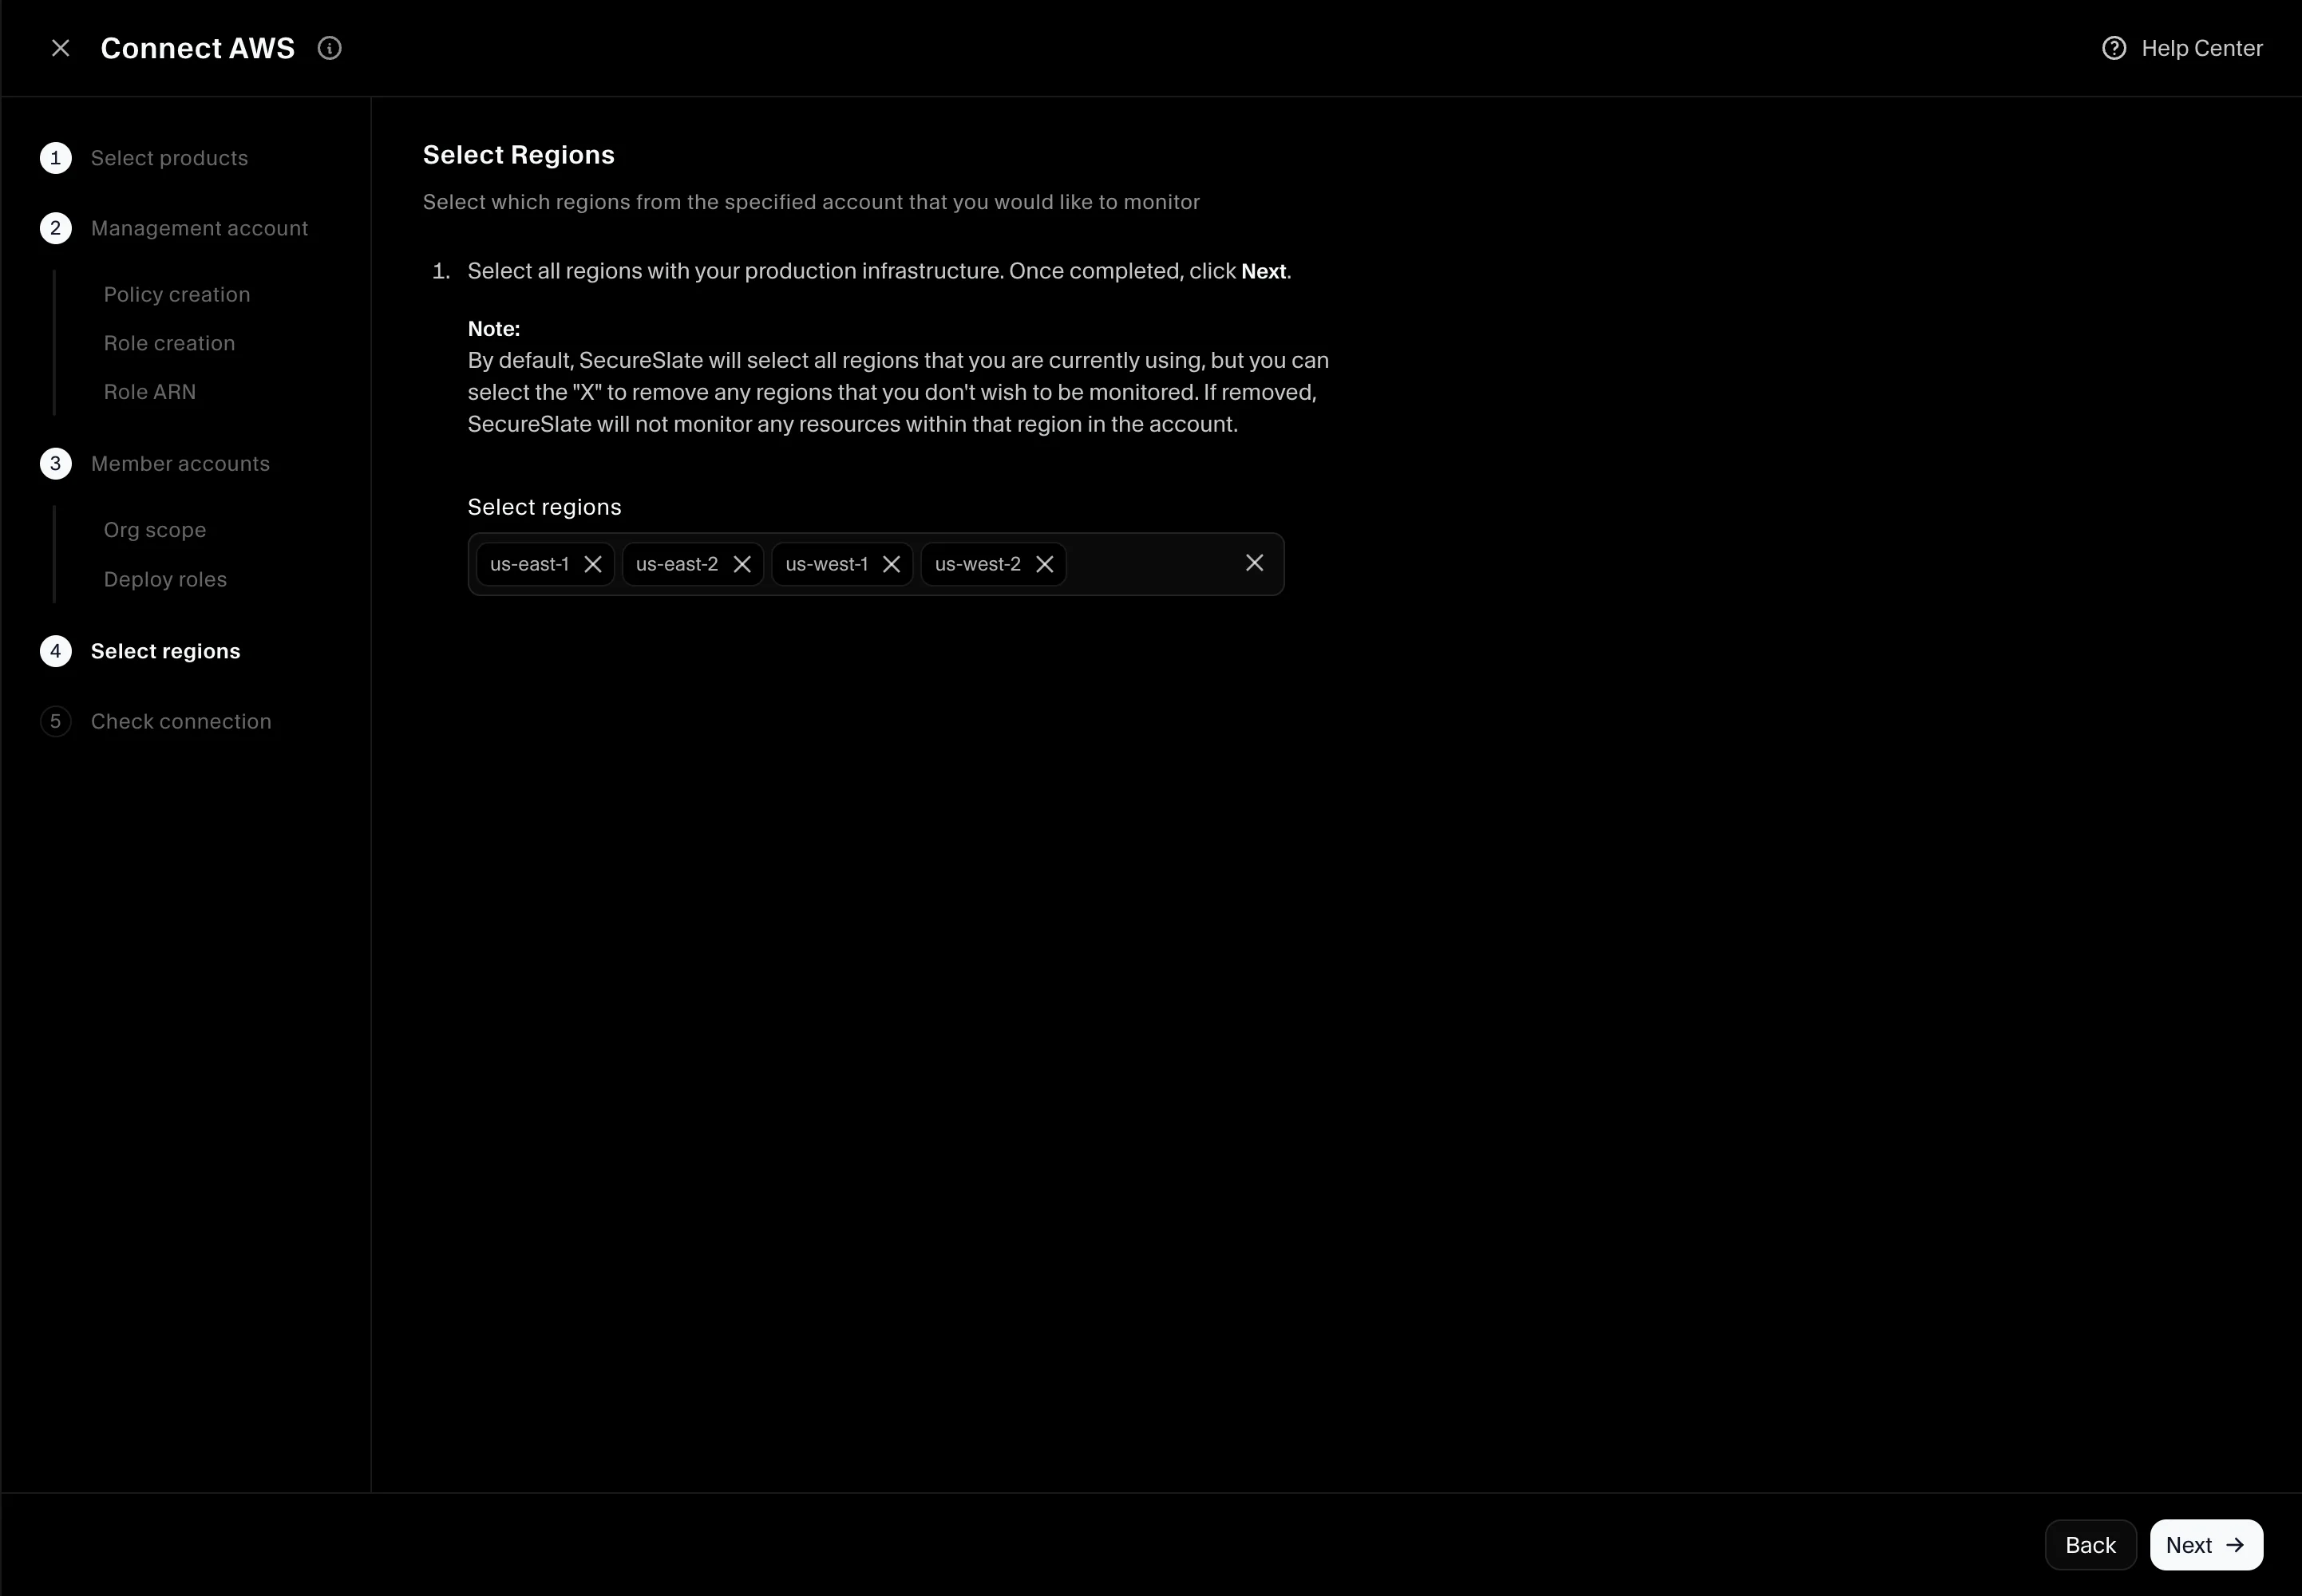
Step 9: Select regions
Select which AWS regions SecureSlate should monitor. Remove regions you do not want scanned.
Click Next.
Step 10: Complete connection
Finish the wizard to save the integration and start the initial sync.

Larger organizations can take one to two hours for the first full sync. Use Sync now on the integration page to refresh data anytime.
Verify the integration
- Open Cloud overview and confirm the AWS organization connection appears.
- Open Checks and filter to AWS to see results populate.
- Open Inventory (User Access) to see accounts discovered across the org after the first sync completes.
Troubleshooting
Test Connection fails on the management Role ARN
- Confirm the role is in the management account, not a member account.
- Confirm SecurityAudit and SecureSlateManagementAccountPermissions are attached.
- Confirm the trust policy External ID matches SecureSlate.
- Re-copy the Role ARN from IAM → Roles → secureslate-auditor.
Member account not syncing
- Confirm the StackSet instance for that account is SUCCEEDED, or that the account has
secureslate-auditorwith both policies (manual path). - Check whether the account is in your excluded list or outside selected OUs.
StackSet wizard has no “Deploy to organization”
- You may have opened Stacks → Create stack instead of StackSets → Create StackSet. Use StackSets from the management account.
Control Tower checks show no data
