Vendor Risk Management
Add a Vendor Manually
Use Add Vendor → Add Manually when you want to create a vendor record yourself—for example, for a new SaaS tool, consulting partner, or service that is not yet detected or imported.
From the sidebar, go to Risk → Vendor Risk, make sure you are on the Active tab, and click Add Vendor → Add Manually.
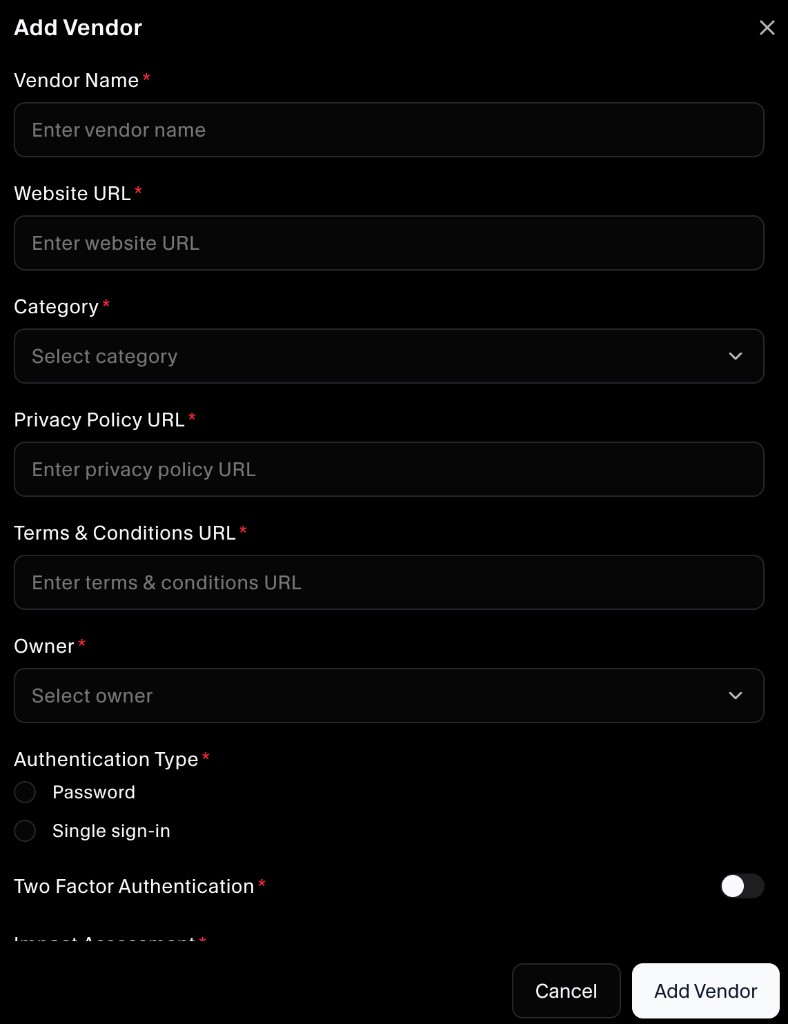
Step 1: Enter basic vendor information
Complete the top section of the form:
- Vendor Name: The name of the third‑party service or company.
- Website URL: Main website for the vendor.
- Category: The type of service (for example, Hosting providers, Task management, Vulnerability scanners).
- Privacy Policy URL: Link to the vendor’s privacy policy.
- Terms & Conditions URL: Link to the vendor’s terms of service or contract page.
- Owner: The internal owner responsible for this vendor relationship and its risk review.
These fields establish who the vendor is, where to find key legal/privacy information, and who is accountable inside your organization.
Step 2: Capture authentication details
Next, specify how users authenticate with this vendor:
- Authentication Type:
- Password: Users sign in directly with a username/password at the vendor.
- Single sign‑in: Users authenticate via SSO/IdP (for example, Okta, Azure AD, Google Workspace).
- Two Factor Authentication: Turn this on if the vendor supports and you require 2FA/MFA for user accounts.
Recording authentication details helps you quickly understand how secure access to the vendor is.
Step 3: Perform an impact assessment
In the Impact Assessment section, select the types of data the vendor stores, processes, or interfaces with.

You can mark:
- Publicly available data (for example, generic, informational, or marketing material)
- Confidential company information (employment records, proprietary information)
- Customer information (public or non‑public customer data)
- Other information (such as card holder or confidential patient information)
Choose all that apply. This helps you prioritize review effort and understand regulatory implications (for example, PCI, HIPAA, privacy laws).
Step 4: Set operational reliance and risk level
Finally, assess how critical the vendor is and set an initial risk rating:
- Operational Reliance:
- Low: Limited operational impact if the vendor is unavailable.
- Medium: Noticeable impact, but core operations can continue.
- High: Major or blocking impact on operations if the vendor fails.
- Risk Level:
- Low, Medium, or High, based on sensitivity of data, access model, and reliance.
You can refine these over time as you complete due diligence and align them with your broader risk management process.
Step 5: Save the vendor
When all required fields are filled, click Add Vendor.
The new vendor appears in the Active list on the Vendor Risk page, where you can track due diligence status, update risk level as you learn more, and eventually archive the vendor if it is no longer in use.
