Integrations
Connecting SecureSlate & Auth0
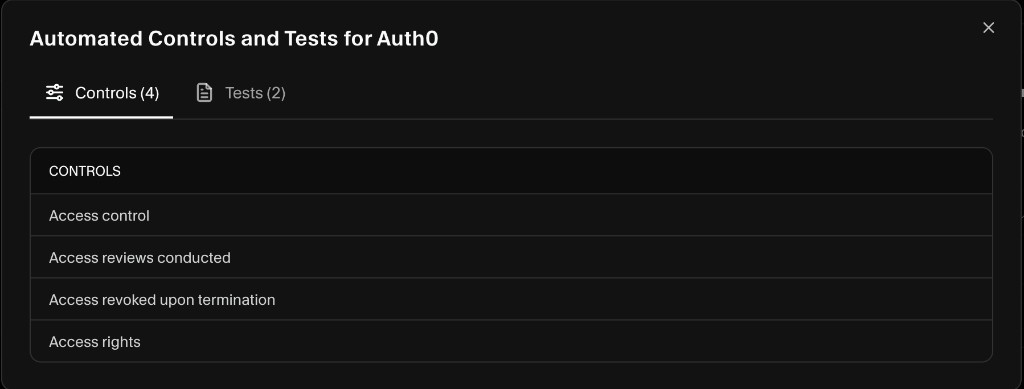
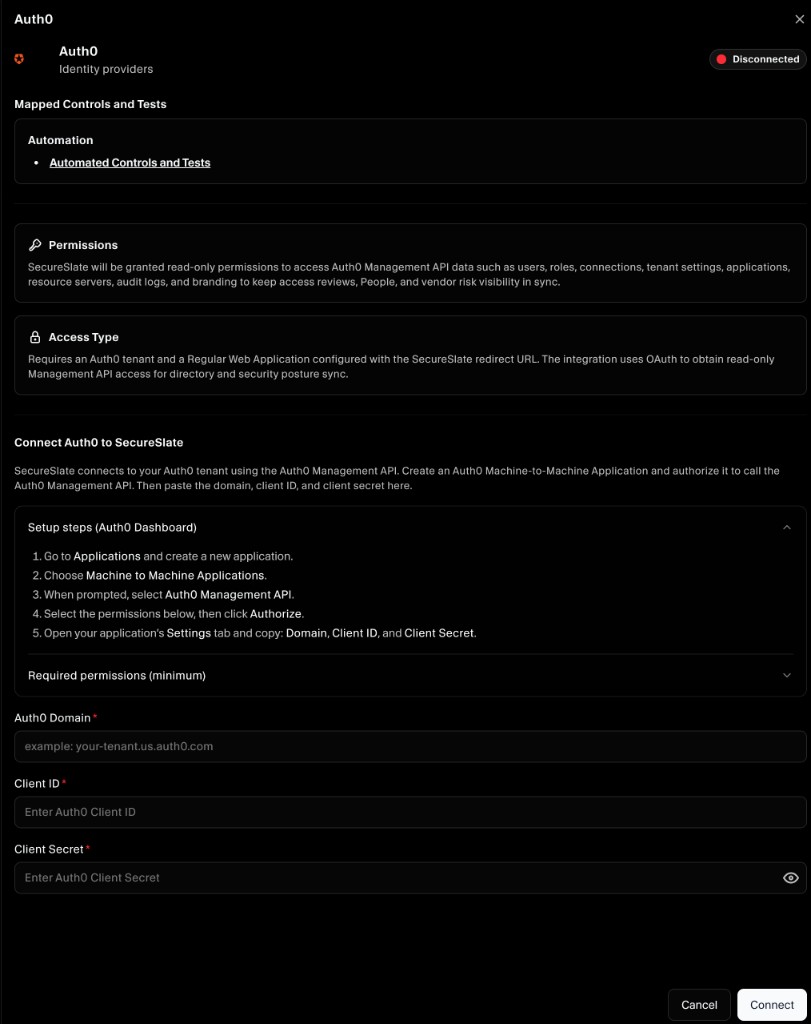
SecureSlate connects to your Auth0 tenant using the Auth0 Management API with read-only permissions. This lets SecureSlate keep access reviews and identity-related checks in sync without making changes to your Auth0 configuration.
Prerequisites
Before you start, make sure you have:
- SecureSlate permissions: access to create/manage integrations (typically Admin).
- Auth0 permissions: access to create a Machine-to-Machine (M2M) application and authorize it for the Auth0 Management API.
Create an Auth0 Machine-to-Machine application
- In Auth0, open Applications → Create Application.
- Choose Machine to Machine Applications.
- When prompted to select an API, choose Auth0 Management API.
- In Permissions, select the read-only permissions SecureSlate needs (see below).
- Click Authorize.
Required permissions (minimum)
In most tenants, SecureSlate only needs read access to identity and access metadata (users, roles, connections, client apps, and audit events). Select the smallest set of read:* scopes that covers what SecureSlate will sync and evaluate.
Common scopes include:
read:usersread:rolesread:connectionsread:clientsread:resource_serversread:logsread:tenant_settingsread:organizations(if you use Auth0 Organizations)
If SecureSlate shows a permissions checklist in the setup flow, follow the in-app list—it is the source of truth for your tenant.
Find your Auth0 Domain, Client ID, and Client Secret
- In Auth0, open the M2M application you created.
- Go to the Settings tab.
- Copy:
- Domain (for example,
your-tenant.us.auth0.com) - Client ID
- Client Secret
- Domain (for example,
Connect Auth0 to SecureSlate
- In SecureSlate, open Integrations.
- Find Auth0 and click Connect.
- Paste your Auth0 Domain, Client ID, and Client Secret.
- Click Connect.
Once connected, SecureSlate will begin syncing identity data. Initial sync time depends on tenant size, but most connections start populating within a few minutes.
Verify the integration
To confirm everything is working:
- Confirm the Auth0 connection appears under Active connections in Integrations.
- Wait a few minutes, refresh, and confirm users/roles data begins to appear in access-review related areas (where enabled for your workspace).
Troubleshooting
If the connection fails or sync does not start:
- Confirm the application is authorized for the Auth0 Management API.
- Confirm you granted the required
read:*scopes (add missing scopes, then retry). - Confirm the Domain value matches your tenant domain and does not include
https://. - Rotate the client secret if you suspect it was copied incorrectly, then update the integration in SecureSlate.
