Integrations
Connecting SecureSlate & 1Password
SecureSlate connects to 1Password through the SCIM API, using read-only calls. We retrieve user and group information for access management and automated evidence collection. SecureSlate does not read passwords or provision/deprovision users.
To use this integration, you need a 1Password Business plan and automated user provisioning already configured with your identity provider (IdP). SecureSlate needs the same two values 1Password gives you for that setup:
- SCIM URL (the SCIM endpoint base URL)
- SCIM bearer token
SecureSlate does not use a separate 1Password account API key. It reads directory data from your SCIM endpoint—either hosted by 1Password or running on infrastructure you deploy.
Hosted provisioning vs self-hosted SCIM bridge
1Password offers two ways to expose SCIM. You only need one; pick the path that matches how provisioning is (or will be) set up in your account.
| Hosted provisioning (1Password) | Self-hosted SCIM bridge (your infrastructure) | |
|---|---|---|
| Who hosts SCIM | 1Password | You (GCP, DigitalOcean, AWS, etc.) |
| Typical SCIM URL | https://provisioning.1password.com/scim/v2 |
Your URL, e.g. https://scim.example.com |
| Deploy your own server? | No | Yes |
| Best for | Microsoft Entra ID, Okta (and beta: JumpCloud, OneLogin) | Google Workspace, Rippling, or when you already run a SCIM bridge |
| Setup in 1Password | Integrations → IdP → Set up hosted provisioning | Integrations → IdP → deploy SCIM bridge |
| Docs | 1Password automated provisioning | SCIM Bridge setup |
Important: Hosted provisioning and a self-hosted SCIM bridge are different products on the same 1Password account. If you use hosted provisioning, you cannot switch back to a self-hosted bridge on that account. Use the SCIM URL and token from whichever path is active in your admin console.
How SecureSlate fits in
Your IdP uses the SCIM URL and bearer token to provision users and groups into 1Password. SecureSlate uses the same URL and token with read-only SCIM calls to list users and groups for compliance—it does not replace or bypass your IdP provisioning setup.
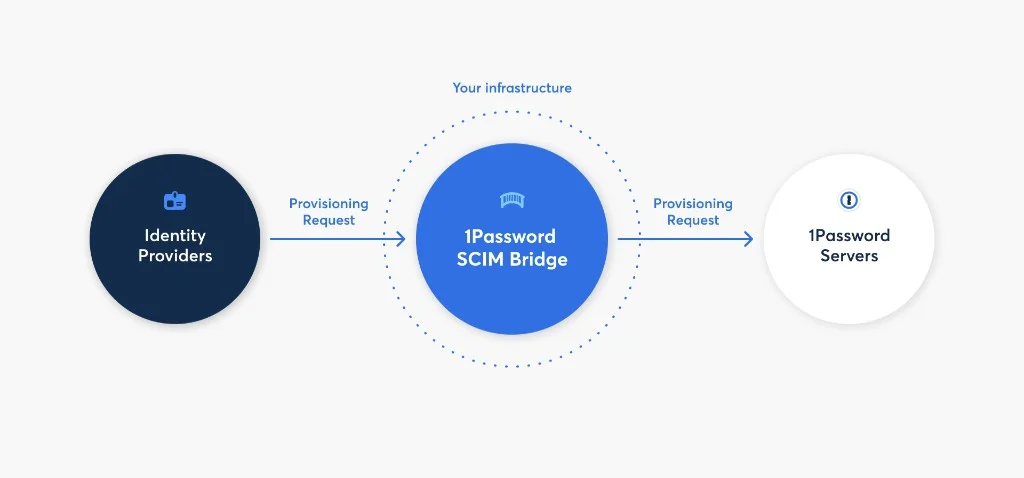
The diagram above shows the self-hosted path: IdP → your SCIM bridge → 1Password. With hosted provisioning, 1Password hosts the SCIM endpoint at provisioning.1password.com instead of your own URL.
Prerequisites
Before you connect SecureSlate, confirm you have:
- Administrator access to your 1Password Business account.
- Automated provisioning configured (hosted or self-hosted) with a supported IdP, such as Microsoft Entra ID (Azure AD), Okta, JumpCloud, OneLogin, Rippling, or Google Workspace (see 1Password’s provisioning overview).
- Your SCIM URL and bearer token from the active provisioning setup (saved securely).
Additional requirements only for self-hosted SCIM bridge:
- A platform to deploy the bridge (for example, Google Cloud Platform, DigitalOcean, or your own infrastructure).
- A public DNS record pointing to the bridge (for example,
scim.example.com).
Option A: Hosted provisioning (no bridge deployment)
Recommended if you use Entra ID or Okta and do not already run a self-hosted bridge.
- Sign in to your 1Password account as an admin.
- In the sidebar, click Integrations.
- Under User Provisioning, select your IdP (for example, Entra ID or Okta).
- Choose Set up hosted provisioning and complete the wizard.
- On the setup page, copy and save:
- SCIM URL — use
https://provisioning.1password.com/scim/v2(no trailing slash) - Bearer token
- SCIM URL — use
- Finish connecting your IdP to 1Password using those values (see Entra ID or Okta guides).
You do not need to deploy a SCIM bridge container or custom DNS for this path.
Option B: Self-hosted SCIM bridge
Use this path if your IdP setup requires a bridge you host, or you already deployed one.
- Sign in to your 1Password account as an admin.
- In the sidebar, click Integrations.
- Under User Provisioning, select your identity provider.
- Follow the on-screen instructions to generate credentials and deploy your SCIM bridge.
After setup, you receive a SCIM URL (your bridge URL) and bearer token. Save both securely (for example, in 1Password). Deployment examples are in the 1Password SCIM examples repository.
Test your self-hosted bridge
Before connecting SecureSlate, verify the bridge is healthy:
- Open your SCIM bridge URL in a browser (for example,
https://scim.example.com). - Sign in with the credentials from your deployment.
- Review the 1Password SCIM Bridge status page for errors and download logs if you need to troubleshoot.
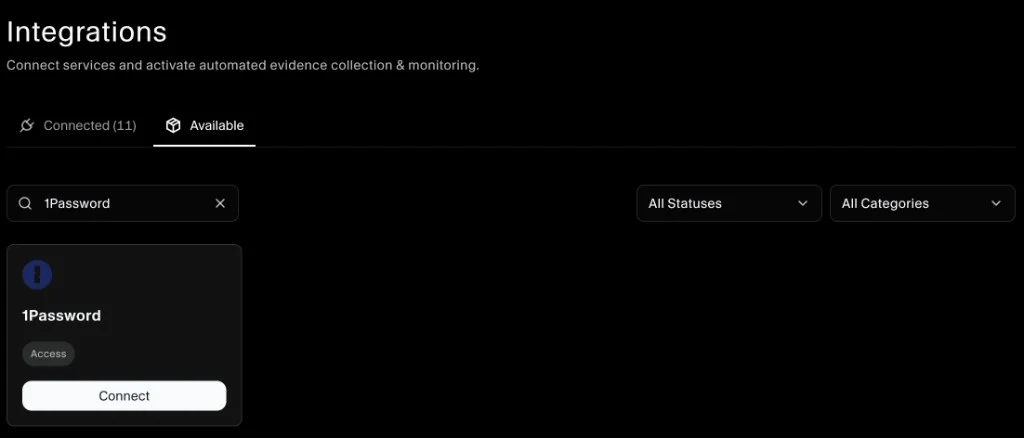
Connect 1Password to SecureSlate
Open the integration
- In SecureSlate, open Integrations from the left sidebar.
- Go to the Available tab.
- Search for 1Password.
- Click Connect on the 1Password card.
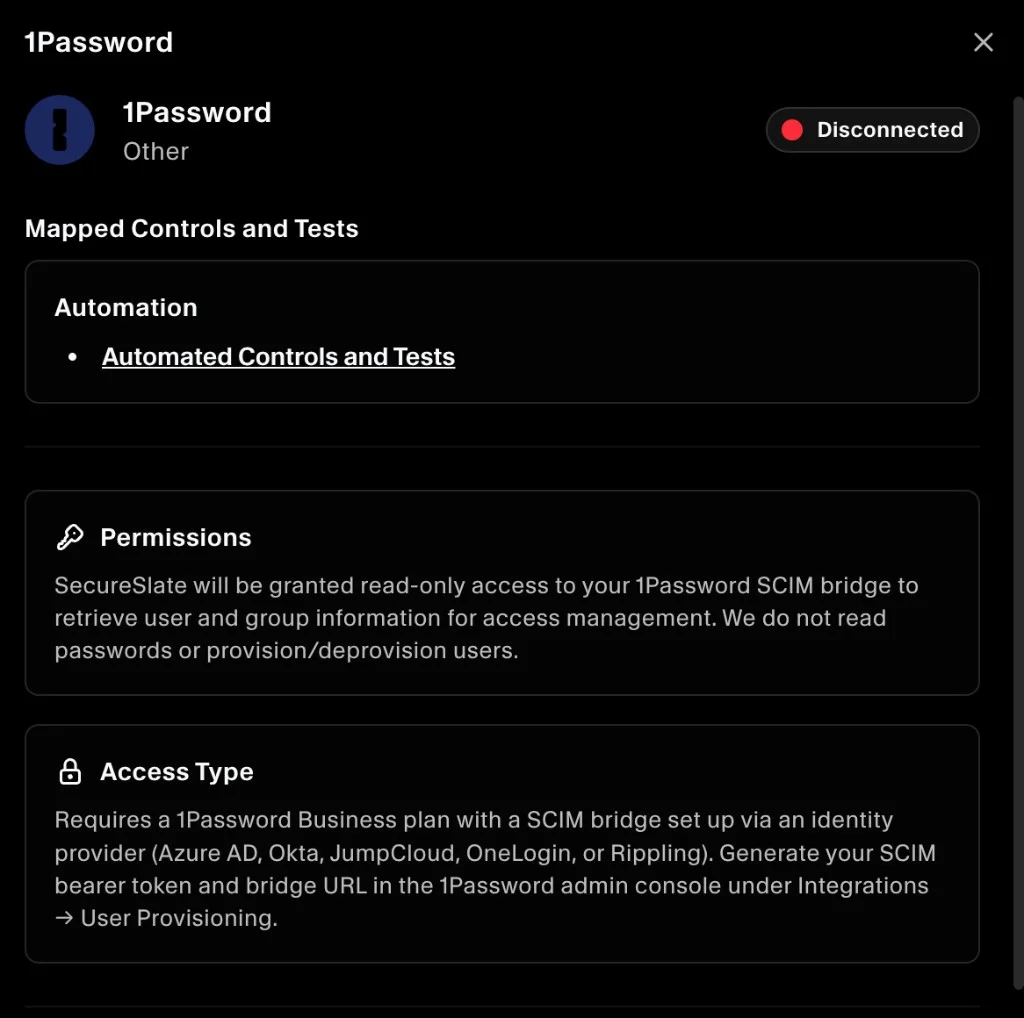
Review the integration details. SecureSlate requests read-only access to your SCIM endpoint to retrieve user and group data. Mapped automation includes Automated Controls and Tests for access-related compliance checks.
Enter SCIM credentials
- Continue through the setup flow to Connect 1Password to SecureSlate.
- Enter your SCIM Bearer Token from Integrations → User Provisioning or Hosted Provisioning in the 1Password admin console.
- Enter your SCIM URL:
- Hosted provisioning:
https://provisioning.1password.com/scim/v2 - Self-hosted bridge: the URL where you deployed the bridge (for example,
https://scim.example.com)
- Hosted provisioning:
- Click Connect.
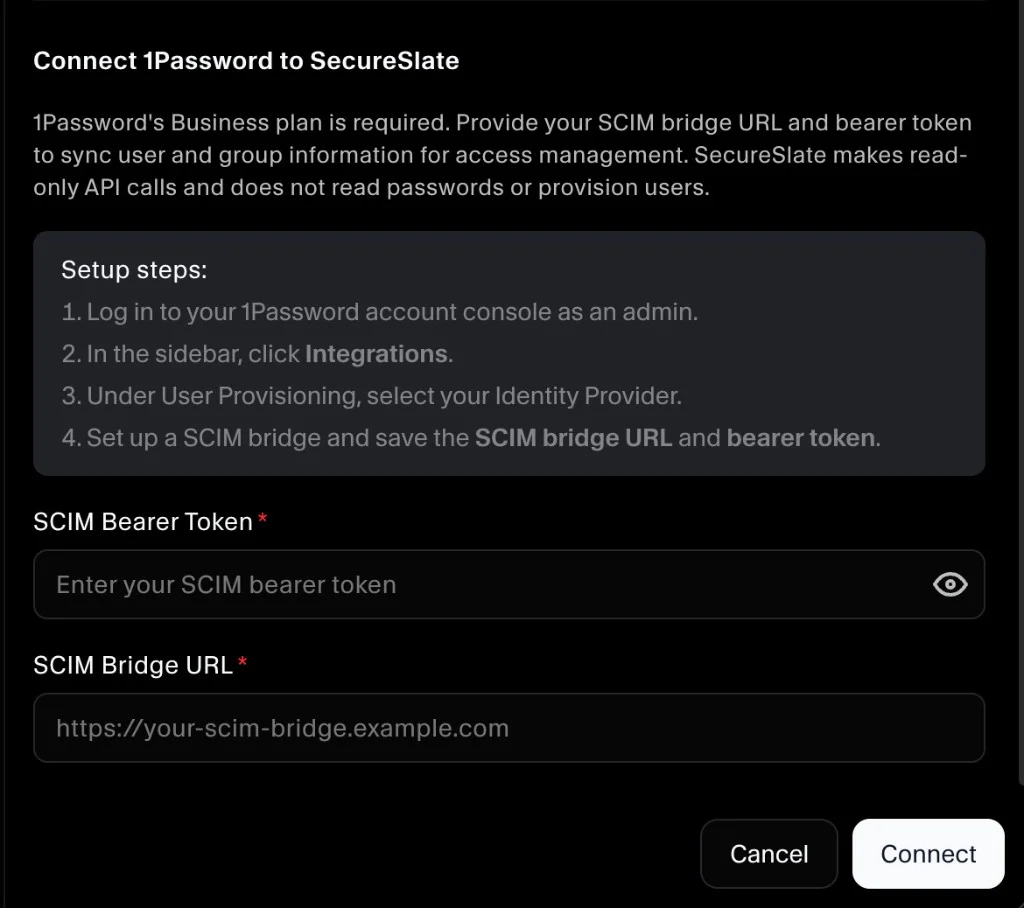
Note: The SecureSlate form may label this field SCIM Bridge URL. Use your SCIM URL from 1Password—hosted or self-hosted—not your 1Password sign-in address (
*.1password.com).
Verify the integration
After a successful connection:
- The 1Password integration appears under Connected on the Integrations page.
- User and group data from your SCIM endpoint begins syncing for access management and related automated tests. Initial sync time depends on the size of your directory.
Troubleshooting
If the connection fails or data does not appear:
- Confirm automated provisioning is active in 1Password (Integrations → Hosted Provisioning or your bridge’s provisioning details).
- Confirm the SCIM URL matches your setup:
- Hosted:
https://provisioning.1password.com/scim/v2(no trailing slash) - Self-hosted: your bridge URL with
https://, reachable from the public internet
- Hosted:
- Confirm the SCIM Bearer Token matches the token from your active provisioning setup (regenerate in 1Password if needed, then update SecureSlate).
- Confirm users and groups you expect are already provisioned in 1Password via your IdP.
- For self-hosted bridges only: check the bridge status page and logs at your bridge URL.
- Confirm your identity provider is supported for your chosen path (hosted vs self-hosted). See 1Password provisioning.
