Asset Management
SecureSlate Evidence Collection Guide for Asset Management
This guide helps asset managers collect and verify evidence for key security compliance requirements. Follow the instructions for your operating system to ensure devices meet organizational security standards.
1. Hard Drive Encryption
Purpose: Protects data at rest by making it unreadable without authentication. Critical for lost or stolen devices.
Windows
Device Encryption:
-
Go to Start → Settings → Privacy & Security → Device Encryption.
-
If Device Encryption is On, take a screenshot.
-
If the option is missing, the device may not support it.

BitLocker (Windows Pro/Enterprise): -
Open Control Panel → System and Security → BitLocker Drive Encryption.
-
Ensure BitLocker is On for your system drive.
-
Save the recovery key securely.
-
Take a screenshot showing the status.
Learn more about HD Encryption
macOS
- Open Apple menu → System Settings → Privacy & Security → FileVault.
- If FileVault is On, take a screenshot.
- To enable, click Turn On, follow prompts, and store your recovery option securely (iCloud or recovery key).
Older macOS versions: Go to System Preferences → Security & Privacy → FileVault tab. Verify it shows "FileVault is turned on".
Important Notes: FileVault must be fully enabled and initial encryption complete. Reboot may be required for compliance tools to detect the status.
2. Anti-Virus / Anti-Malware
Purpose: Detects and removes malicious software to protect devices and company data.
Windows
Windows Defender (Built-in):
- Start → search Windows Security → open app.
- Click Virus & threat protection.
- Ensure Real-time protection is On.
- Verify updates are current.

Third-party Antivirus: Check Settings → Apps → Installed apps for software like Norton, McAfee, Bitdefender, Trend Micro, Sophos, Avast, AVG, Webroot.
Evidence: Screenshot of Windows Security showing real-time protection; screenshot of antivirus software in installed apps; screenshot showing definitions updated within last 7 days.
macOS
Built-in Protection (XProtect & Gatekeeper): Apple menu → System Settings → Privacy & Security. Ensure "Install system data files and security updates" is enabled. Under Security, verify App Store and identified developers selected.
Third-party Antivirus: Check Applications folder for Norton, McAfee, Bitdefender, Trend Micro, Sophos, Malwarebytes. Use Spotlight search if needed.
Evidence: Screenshot of Security & Privacy settings; screenshot of Applications folder; screenshot from antivirus showing active status and updated definitions.
Important Notes: Antivirus definitions should be updated at least weekly. Software must provide real-time protection.
3. Password Policy
Purpose: Ensures strong passwords to reduce risk of compromise.
Common Requirements: 8–14+ characters (longer recommended); uppercase & lowercase letters; at least one number and one special character; no username or common words; no reuse of recent passwords.
Windows
Active Directory / Local Account: Press Windows + R, type secpol.msc, press Enter. Navigate Account Policies → Password Policy. Check minimum length, complexity, max/min age, history.
Group Policy (Domain): Press Windows + R, type gpmc.msc, press Enter. Navigate Computer Configuration → Policies → Windows Settings → Security Settings → Account Policies → Password Policy.
Evidence: Screenshot of Local Security Policy; document requirements (length, complexity, age). For Group Policy, screenshot Domain Default Policy.

macOS
Go to System Settings → Users & Groups. Click (i) next to a user account to view password requirements.
MDM Environments: Contact IT for enforced password policies. Export screenshot or profile if possible.
Important Notes: Many organizations enforce policies via Active Directory, Azure AD, Okta, etc. NIST recommends longer passwords over complex short ones.
4. Screen Lock Policy
Purpose: Prevents unauthorized access when devices are unattended.
Compliance Requirement: Lock automatically after ≤15 minutes of inactivity. Require password immediately when unlocking.
Windows
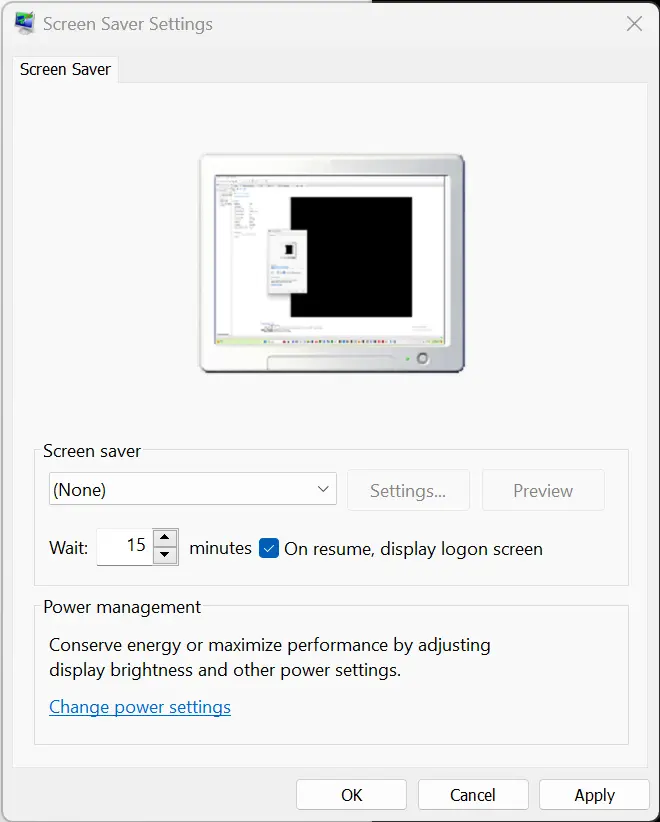
Option 1 – Screen Saver Settings: Start → search screen saver → Change screen saver. Select screen saver (not None). Set Wait ≤15 minutes. Enable "On resume, display logon screen".
Option 2 – Sleep Settings: Settings → System → Power & Sleep. Set sleep timers ≤15 minutes for battery and plugged-in. Accounts → Sign-in options → Require sign-in on wake: Immediately.
Option 3 – Group Policy (if applicable): Use "Interactive logon: Machine inactivity limit" to lock screen 1–15 minutes.
Evidence:
- Screenshot of screen saver settings;
- screenshot of power & sleep settings;
- screenshot of sign-in options.
macOS
Option 1 – Lock Screen Settings: Apple menu → System Settings → Lock Screen. Start screen saver ≤15 minutes. Require password: Immediately.
Option 2 – Display & Power Settings: Battery / Energy Saver → Display turn-off ≤15 minutes for both battery and adapter.
Evidence: Screenshots showing screen saver and password timing. Screenshots should include device name and current settings.
Important Notes: Total idle time ≤15 minutes. Both battery and adapter settings must comply.
5. Firewall
Purpose: Monitors and controls network traffic to prevent unauthorized access.
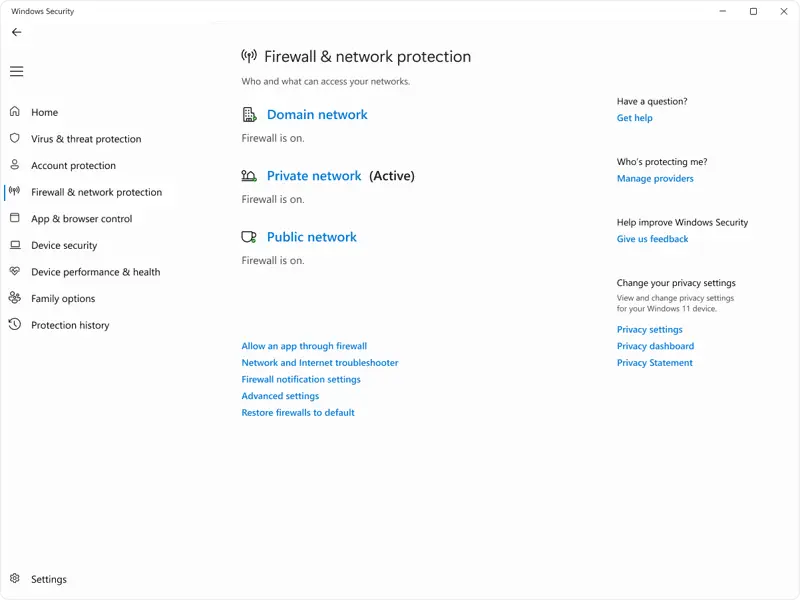
Windows – Windows Defender Firewall
Start → Windows Security → Firewall & network protection. Ensure Domain, Private, Public networks all show "Firewall is on".
Alternative: Press Windows + R, type firewall.cpl, Enter.
Evidence: Screenshot showing firewall enabled for all network types. Include date and time.
macOS – Application Firewall
Apple menu → System Settings → Network → Firewall. Verify firewall is On.
Older macOS: System Preferences → Security & Privacy → Firewall tab → Firewall: On.
Recommended Options: Allow built-in software and signed downloaded apps. Optional: Enable stealth mode.
Advanced Terminal Check:
/usr/libexec/ApplicationFirewall/socketfilterfw --getglobalstate
Output should show: Firewall is enabled. (State = 1)
Evidence: Screenshot of System Settings toggle. Terminal output showing firewall state.
Important Notes: macOS firewall is off by default; enable for public networks, servers, or non-App Store downloads.
Tips for Asset Management
Screenshots should include: Date & time; Device name; Full window showing setting/status.
Organize evidence by: Device name or asset ID; Date of collection; Control type.
Verification: Check compliance monthly/quarterly; document exceptions or remediation plans; keep evidence in a centralized repository.
Common Issues & Solutions
| Issue | Solution |
|---|---|
| Encryption not showing | Verify process completed, reboot, check updates |
| Antivirus out of date | Manually update, verify internet connectivity, enable automatic updates |
| Screen lock not working | Check power settings, group policies, user settings |
| Firewall disabled | Re-enable via system settings, verify third-party conflicts, check group policies |
Related guide
For step-by-step instructions on uploading this evidence during onboarding in SecureSlate, see Manual evidence uploads for personnel asset compliance check.
Need Help?
- Contact IT Security team
- Consult organization's security policies
- Reference your compliance framework (SOC 2, ISO 27001, HIPAA, etc.)
